
[マインクラフト]UBUNTU Linuxによるお古のノートパソコンを使ったJava向け、簡単マインクラフト自宅マルチサーバの作り方。[Minecraft] How to make a simple Minecraft home multi-server for Java using an old laptop computer by UBUNTU Linux.(spigot1.19.3+Multiverse+crackshot+MGS4.0)
◎目的:spigotでひとまずは、何人かで遊べるMultivirseな世界を持った自宅ノートサーバを、安く作ること。そして、今のところ家の中で使うので簡単にサーバがメンテナンスできて、各ワールドへメインワールドからポータルでいけること。
〇ひとまずの利用者の要望
:クリエイティブ主体でWorld-editを使いたい。
:銃が使ってみたい。
:CrackShotをプラグインとして入れる
:CrackShot Plugin Resource Pack 1.19.1で武器種類と見た目のリソースの統合を楽にする
:MGS4.0をデータパックとして入れる(データパックは世界に働くものであるため、Multivirseとの関係がある)
目次
0.必要なスペックについての私の考え・・・Javaを動かすためにWindowsといった大げさなOSはいらないので、UBUNTU-Linuxで作る。(安くできるし簡単なほうがいい)
1.まずはUBUNTU Linuxのインストールをする。
2.ノートパソコンサーバの下準備・・・デスクトップ付きで、遠隔操作のできるおきらくサーバ環境を作る。それと、javaを動かす下準備とか。
3.マインクラフトサーバspigotのビルドによる取得
4.サーバの起動と、プラグイン(データパック)の設置・・・クライアント(実際にゲームを動かすほう)からの初期設定とサーバ上の置き方も考えに入れる。
0.必要なスペックについての私の考え
0. My thoughts on the required specs
今回使った、お古のノートパソコンはこのようなものです。
Here is the old laptop I used for this server.
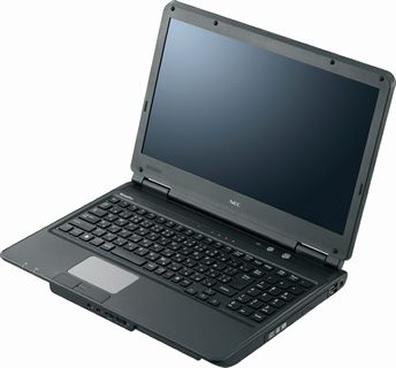
●NEC VK25TX-F
CPU:i5-3210M 2.50 GHz(Turbo Boost 3.10GHz)2Cores / 4Threds
Chipset:HM75 Express
RAM:8GB(Replaced)
GPU:HD Graphics 4000
SSD:500GB(Replaced)
LCD:15.6" TFT 1,366×768
LAN:1000Base-T RJ45 LAN-Connecter
10年くらい前のかなりよわよわしいスペックです。10,000円($100)位でメルカリなど中古で手に入れました。
It is a pretty weak spec from about 10 years ago. I got it secondhand on Mercari for around 10,000 yen ($100).
このノートパソコンを利用するために、メモリとSSDを交換しました。これはサーバとしての使用に耐えうるためです。
In order to use this laptop, I replaced the memory and SSD. This is because it can withstand use as a Minecraft server.
もしあなたが「いいえこれはマインクラフト個人用サーバにはふさわしいスペックではありません」と言うなら、それは考え間違えだと思います。以下のことを考えてみてください。
If you say “No, this isn’t the right spec for a Minecraft personal server", you’re wrong. Consider the following.
いまだに、マインクラフトサーバはレンタルサーバの需要はあるようですが、このゲーム自体が古いものなので、重い処理を行うことはないようです。
参考:これからマイクラ鯖を建てたい人に言いたい事
It seems that there is still a demand for rental servers for Minecraft servers, but since this game itself is old, it seems that there will be no heavy processes too.
Reference: What I want to say to people who want to build Minecraft server
グーグルを検索すると以下のように答えが返ってきます。
MinecraftのサーバーをWindowsで快適にプレイするためには3.4Ghz以上でかつ4コア以上のCPUが搭載されているPCが推奨です。 また、Minecraftが動いているJavaというプログラムはメモリをかなりの量消費するため、PCのメモリが6GB以上あると快適に動作します。
A google search gives the following answers:
In order to play the Minecraft server comfortably on Windows, a PC with a CPU of 3.4 Ghz or more and 4 cores or more is recommended. Also, the Java program that Minecraft runs on consumes a considerable amount of memory, so it will work comfortably if your PC has 6GB or more of memory.
しかし、これはWindowsでサーバを作った場合であって、Windows自体が各種サービス(OSの自分のために)を動かすために必要な部分が多いためです。そのため、Core2程度の時代からあったMinecraftサーバについて、正しい知見を与えていません。10年前にWindowsが必要としていたスペックを考えれば(4コアで3.4GHzで6GBメモリもあったでしょうか?)当たり前に真実ではないと思われることです。
However, this is the case when a server is created on Windows, and there are many parts that are necessary for Windows itself to operate various services (for its own OS). It does not give correct knowledge about Minecraft servers that have actually existed since the Core2 era. Let’s consider the specs Windows needed 10 years ago. 4cores/3.4GHz/minimum 6GB Ram that seems to be not truth.
つまりはっきり言えば、今のWindows自体がスペックを必要としているです。MinecraftのJavaのサービスを動かすだけなのに、Windowsが必要としている大げさなスペックはいらないのです。軽いJavaサーバーを動かすのに、大げさなWindowsは必要はありません。単純に頭を使って安くて便利なLinux(例えばUBUNTU)を使いましょう。
In other words, to put it bluntly, the current Windows itself needs specs. You don’t need the exaggerated specs that Windows requires just to run Minecraft’s Java service. You don’t need a fancy Windows to run a lightweight Java server. Simply use your head and use cheap and convenient Linux (e.g. UBUNTU).
0.1 「ポート開放」という言い方の誤解について。(読み飛ばして構いません)
0.1 Regarding the misunderstanding of the term “port open".(You probably don’t need to read this chapter.)
たとえ、Linuxで動くレンタルサーバを使っても、ufwコマンドで「ポート開放」という意味の誤解があるようです。
正しくは:ufwコマンドは何かというとこうなります。ufw(Uncomplicated FireWall)は、ファイアウォールの設定を行うコマンドです。ですからポートを開放するコマンドではありません。
Even if you use a rental server that runs on Linux, there seems to be a misunderstanding about the meaning of “opening a port" with the ufw command.
Correctly: What is the ufw command? ufw (Uncomplicated FireWall) is a command to configure the firewall. Therefore, it is not a command to open a port.
レンタルサーバの場合、ファイアウォールをあるポートでなくすことによって、インターネットにつながるために「ポートを開放する」と誤ったのでしょう。
また、Windowsを利用した自宅サーバによって混同した考え方が広まったようです。Windowsではファイヤウォールをなくすことをポート開放というようです。
参考:Windows ファイアウォールのポート開放(WindowsServer 編)
正しい「ポート開放」考え方は、たんに外部に向かってポートの障害を取る意味がWindowsではあるようです。しかし、自宅Webサーバなどを作った方は知っていると思います。「ポート開放」とは、ルータ等で特定のポートの通信を(外部:インターネットに)許可して、内部のIPアドレスに属するパソコンに紐づけることです。
“Port opening" seems to mean unblocking ports to the outside world in Windows. But this is a Windows bias. Anyone who built a home web server knows this. The correct “port opening" is to allow communication of a specific port (external: port to the Internet) such as a router and associate it with a computer belonging to an internal IP address.
参考:ポート開放、NAT、DMZ、ファイアウォールの違い
また、Minecraftサーバは暗号化をします。しかしそれにはログイン概念がなく、BANやWhitelist制限はあっても、誰にでも答えてしまいます。これはあまり良いセキュリティとは私には思えません。個人のサーバを仲間内で利用する(友達と共有)する場合に、インターネット上にポートを開放しないといけません。しかし、みんなが知っているデフォルトのポート番号を開けるのはリスクが高すぎます。違うポート番号を外部(インターネット)に転送する形で割り振っておくべきだという人もいます。(現実的にはそれが今のところベストかもしれません。)しかし、ポートスキャン攻撃をしつこくかけられたら、厄介な問題を抱えるかもしれないと私は憂慮します。
Also, Minecraft servers do encryption. But it has no login concept and will answer anyone, even with bans and whitelist restrictions. This doesn’t sound like very good security to me. When using a personal server among friends (sharing with friends), you have to open a port on the Internet. But opening the default port numbers that everyone knows is too risky. Some people say that you should assign a different port number to the outside (internet). (Realistically, that might be the best thing for now.) But I’m concerned that if a portscan attack persists, I might have a nasty problem.
1.まずはUBUNTU Linuxのインストールをする。
1. First, install Ubuntu Linux.
まずはUBUNTU Linuxをインストールします。5年間サポートが有効なLTS版をぜひ使いましょう。今現在の最新のLTSは22.04LTSです。
First install Ubuntu Linux. It’s convenient to use the LTS version with 5 years of support. The current latest LTS is 22.04LTS.
インストール作業を簡単に言えば、「UBUNTUのサイトから、isoファイルをダウンロードして、USBメモリに(Rufusなどで)書き込んで起動を始めれば」インストールできます。10年前のノートパソコンではもしかすると、USBから起動しない場合もありますが、その場合は古いけれど有効な方法であるDVD-ROMを使ってインストールしましょう。
Simply put, you can install it by downloading the iso file from the UBUNTU site, writing it to a USB memory (with Rufus, etc.) and starting booting. If you have a 10-year-old laptop that probably won’t boot from USB, you can install it using the old but effective DVD-ROM method.
参考:古いパソコンのちょっと使いや、マイクラサーバ等の各種サーバにも活躍:UBUNTU Linuxのインストール方法(Useful for a little use of old personal computers and various servers such as Minecraft servers: How to install UBUNTU Linux)
間違えないでほしいことがあります。その間違った考え方は「サーバ用途なのでUBUNTUサーバ版を使わないとサーバでない」という誤解です。それは、不便でほとんど意味がありません。いまのJava版のほとんどのマインクラフトサーバは、GUIモードを備えておりログが見れるほか、メモリの使用量などもグラフで表示されます。ですからデスクトップを入れるくらいの誤差といっていいくらいのメモリを節約する必要はあまり意味がありません。
Don’t get me wrong. The wrong way of thinking is the misunderstanding that “it is not a server unless you use the Ubuntu server version because it is for server use". It’s inconvenient and makes little sense. Most of the current Java version of Minecraft servers have a GUI mode that allows you to view logs and graphs of memory usage. So it doesn’t make much sense to save little memory to install a desktop environment.
2.ノートパソコンサーバの下準備
2. Basic preparing the laptop server
2.0 IPアドレスを固定する
2.0 Configure your router’s DHCP to set a static IP address for this server
今のルータは、DHCP(IPアドレスの自動的な貸し出し)の項目で、MACアドレスとIPアドレスを入れることによって、特定のパソコンのIPアドレスを固定できます。この方法はルータによって異なりますので詳しくはお使いのルータの説明書を見て、IPアドレスの固定をしてください。
Current routers can fix the IP address of a specific computer by entering the MAC address and IP address in the DHCP (automatic lending of IP address) item. This method differs depending on the router, so please refer to your router’s manual for details on how to fix the IP address.
2.1 ノートパソコンで蓋を閉じていてもサスペンドモードになってしまったり、起動しないのを禁止する
2.1 Prohibit entering suspend mode or not booting when laptop lid is closed
「/etc/systemd/logind.conf」という ファイルを編集し下記の様に行を変更します。端末(ターミナル)でnanoという簡単なエディタ(ファイルを書き換えるアプリ)を使って操作します。ターミナルを動かしたのちに以下のようにコマンドを打ちます。
Edit the file “/etc/systemd/logind.conf" and change the line as follows. Operate using a simple editor (an application that rewrites files) called “nano" on the terminal. After running the terminal, type the command as follows.
今後の説明で「コマンドで打ち込んでください」と言う場合は、端末を使って打ち込むことです。また、記載上「$」を書いていますがこれはお決まり事として打ちこみません。
In the following explanations, when I say “Please type in a command", I mean using the terminal to type it in. In addition, although “$" is written in the description, it is not typed as a rule.
$ sudo nano /etc/systemd/logind.conf#HandleLidSwitch=suspend
という行を以下のように変えます。
change this line to:
HandleLidSwitch=ignore
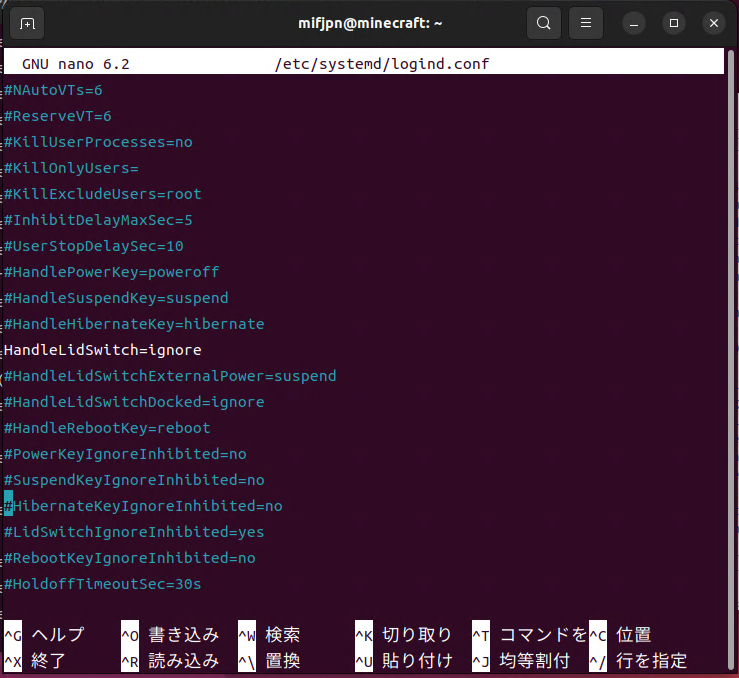
こんな感じです。^O^X(Ctrl-o,Ctrl-x)を押して、書き込んで終了します。
Press ^O^X (Ctrl-o, Ctrl-x) to rewrite the file and exit.
この設定を適用させるためには、以下のコマンドを打ち込むとよいでしょう。
To apply this setting, you should type the following command.
$ sudo systemctl restart systemd-logindこのコマンドでうまくいかない場合は、再起動した方が適用が楽かもしれません。
If this command doesn’t work, it might be easier to apply by rebooting.
2.2.リモートデスクトップで他のパソコンから監視・遠隔操作できるようにする
2.2. Enable remote desktop for monitoring and remote control from other computers
サーバは、別のバックアップ起動USBメモリなどから再起動したりしない限り、直接触る機会はありません。つまりサーバの置き場所は通常、邪魔にならないところにおいておくものです。さらに、そのサーバのノートパソコンのふたを閉じたままのことが多いものです。いちいち、設定を変えるためなどに、取り出したりすることはしません。ですから、リモートデスクトップによって、他のパソコンから監視・遠隔操作できるとよいでしょう。
The server has no chance of being touched directly unless it is rebooted from another backup boot USB stick or similar. In other words, servers are usually placed out of the way. In addition, the lid of the server laptop is often left closed. You don’t have to take it out to change the settings one by one. Therefore, it would be nice to be able to monitor and remotely control it from another computer using remote desktop.
まず、Ubuntu22.04LTSから基本的にRDPという規格によって接続することになりました。(昔はVNCという規格でしたが、補助的なものになったようです。そのため、まだデバックが行われています。ですから、もしかするとVNC接続ではつながらないかもしれません。)
First of all, from Ubuntu22.04LTS, connection is basically based on the RDP standard. (It used to be a VNC connection. It seems to have become an auxiliary thing, so it’s still being debugged. So it may not be possible to connect with a VNC connection.)
2.2.1.サーバ側の設定
2.2.1.Server-side settings
接続パスワードが自動で変わらないように、ログインキーリングをブランク(空白)にしておく。
Leave the login keyring blank so that the connection password does not change automatically.
以下のように「パスワードと鍵」を出してクリックして実行する。
Enter “password and key" as shown below and click to execute.
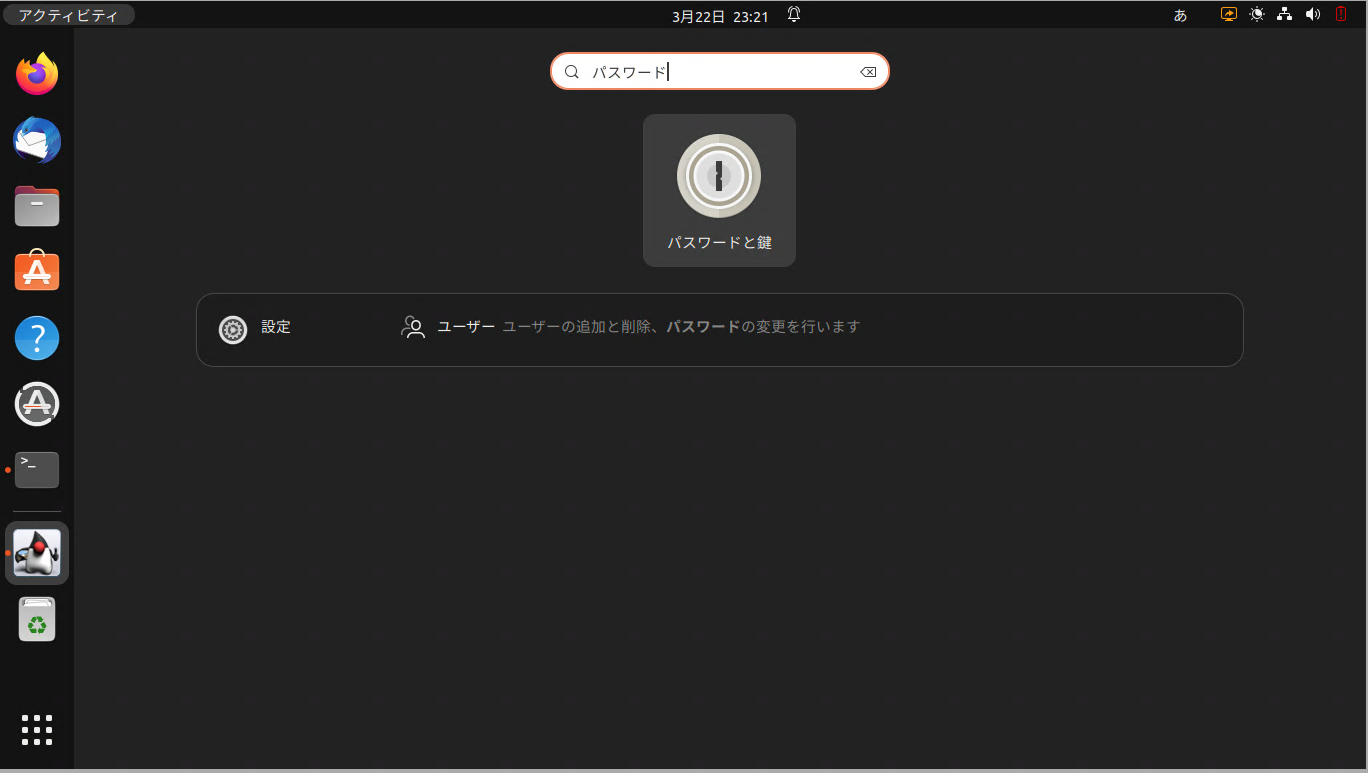
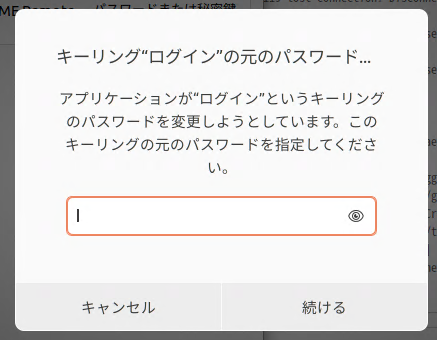
出てきた、「パスワードと鍵」アプリのウインドウ上の右ペインのログインを右クリックします。つぎに、出てきた項目のうちパスワードを変更を、左クリックします。
Right-click Login in the right pane of the “Passwords and Keys" app window that appears. Next, left click on “Change Password".
以下のウインドウが出るので、キーリングのパスワードを以前に設定した場合は、そのパスワードを入れます。それを設定していない場合は、空白のまま続行していいと思います。
The following window will appear, and if you have previously set a password for your keyring, enter that password. If you haven’t set it, you may leave it blank and continue.
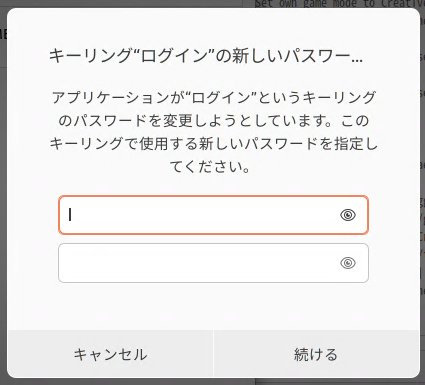
次はこのキーリングのパスワードを設定するウインドウが出ます。そのウインドウでは、パスワードを空白のまま(上の枠も下の枠も)「続ける」を押してください。
Next you will be prompted to set a password for this keyring. In that window, leave the password blank (both in the top and bottom boxes) and press “Continue".
 つぎに、以下のようなウインドウが出ます。
Then the following window will appear.
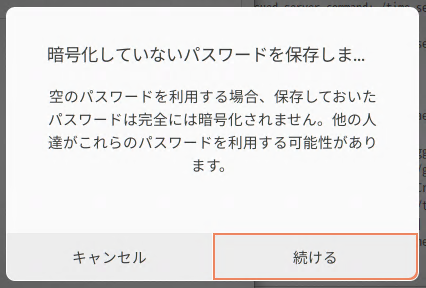 「他の人たちがこのキーリングパスワードを利用する可能性がある」と忠告されます。実際にはこのサーバのリモートデスクトップに入る際の名前とパスワードは自分で決めることができます。また、このサーバは自宅内のローカルアドレス内のあるため、外のインターネットとはつながりませんので、実質的な問題はないので安心してください。そこで、このまま「続ける」をクリックしてください。
You are advised that “other people may take advantage of this keyring password" by the server. Actually, you can decide the name and password for entering the remote desktop of this server yourself. Also, since this server is within the local address of your home, it is not connected to the outside Internet, so please be assured that there is no real problem. So just click “Continue".
次に実際のリモートの名前、パスワードの設定をしリモート可能にします。トップバーの右上部分をクリックし、設定をクリック。出たウインドウの右ペインで、共有をクリック。ウインドウのタイトル部分の「共有」横のスライドスイッチをオンにします。「コンピュータ名」の枠に好きな名前を入力後します。
Next, set the remote desktop name (ID) and password, and enable server remoting. Click the upper right portion of the top bar and click Settings. In the right pane of the settings window that pops up, click Share. Turn on the slide switch next to “Share" in the title of the window. Enter any name in the “Computer Name" box.

次にこのウインドウのリモートデスクトップをクリックします。
Then click Remote Desktop in this window.
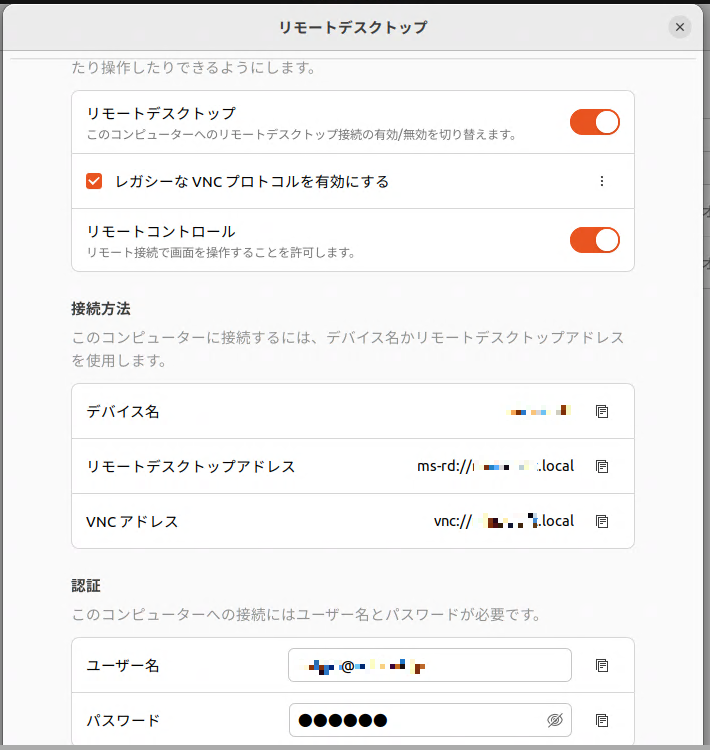 上のような、でてきた「リモートデスクトップ」ウインドウで上部のスイッチ、チェックボックスを上の画像と同じように設定します。そのウインドウの下部の「ユーザー名」(通常は、メールアドレス形式)と「パスワード」を入れます。(これらで入力したのは、デスクトップをリモートするときに必要な、「名前(ID)」と「パスワード」になります。)
In the “Remote Desktop" window that appears above, set the switches and check boxes at the top in the same way as the image above. Enter your Username (usually in email address format) and Password at the bottom of the window. (These are the “name (ID)" and “password" required when remote desktop.)
2.2.1.1.サーバ側のファイヤウォールの設定
2.2.1.1. Server-side firewall settings
一度だけ行えばよいのは、「ファイアウォール有効にして(原則的にファイヤウォールは締めておく)」というコマンドです。
The one-time(first time
) only command is “firewall set to be enabed (and in principle keep closed)" command.
$ sudo ufw enable
$ sudo ufw  default  deny
今、ファイヤウォールをこえて有効にしたいのは、リモートデスクトップ関係のポートです。何時もつかうRDPというプロトコル(通信のきまり)では、3389のポート番号でサーバ側は待ち受けます。簡単でこれからできれば使いたいと考えているVNCでは、5900と、5901のポートを開けておけばいいでしょう。
Now, I want to release the firewall for remote desktop related ports. In the protocol (rule of communication) called RDP that is used all the time, the server side waits on the port number of 3389.
I recommend opening the port number 5900 and 5901 for VNC.
The VNC is easy and I’d like to use from now on,I think.
$ sudo ufw allow 3389
$ sudo ufw allow 5900
$ sudo ufw allow 5901
$ sudo ufw reload 細かい事を言えば、さらにtcp/udpと言った設定もありますが、自宅内にあるためあまり気にしていません。気になる方は調べて設定してください。
To be more specific, there is also a setting called tcp/udp, but I don’t care much because it’s at home. If you are interested, please check and set it.
2.2.2.リモートデスクトップクライアント側の設定
2.2.2. Settings on the remote desktop client side
Windows11で動くmRemoteNGをもとに説明します。
I will explain based on mRemoteNG that runs on Windows 11.
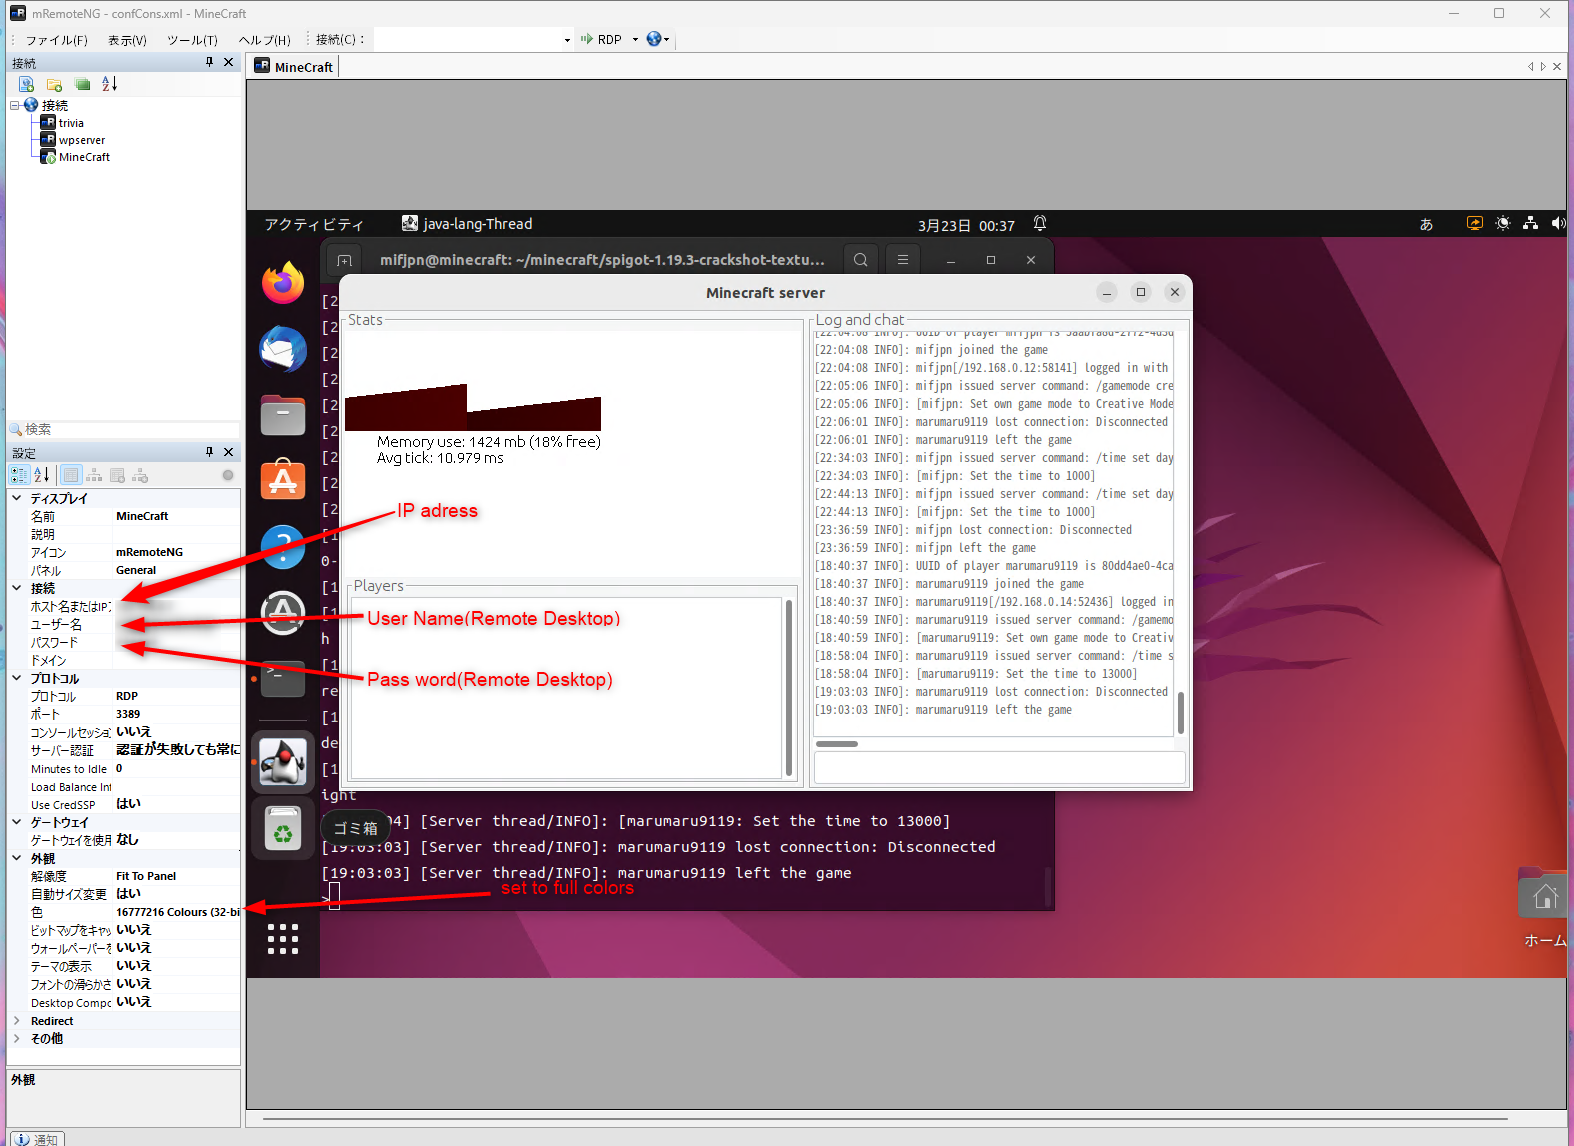 上の画像の様に、IPアドレス、ユーザーネーム、パスワードを設定しましょう。また、色の設定について、「フルカラー」にしないと接続できない場合がありました。
Set the IP address, username, and password as shown in the image above. Also, in some cases, connection was not possible unless the color setting was set to “Full Color".
2.2.3 リモートデスクトップのための細かな設定(サーバ側)
2.2.3 Another detailed settings for remote desktop working(server side)
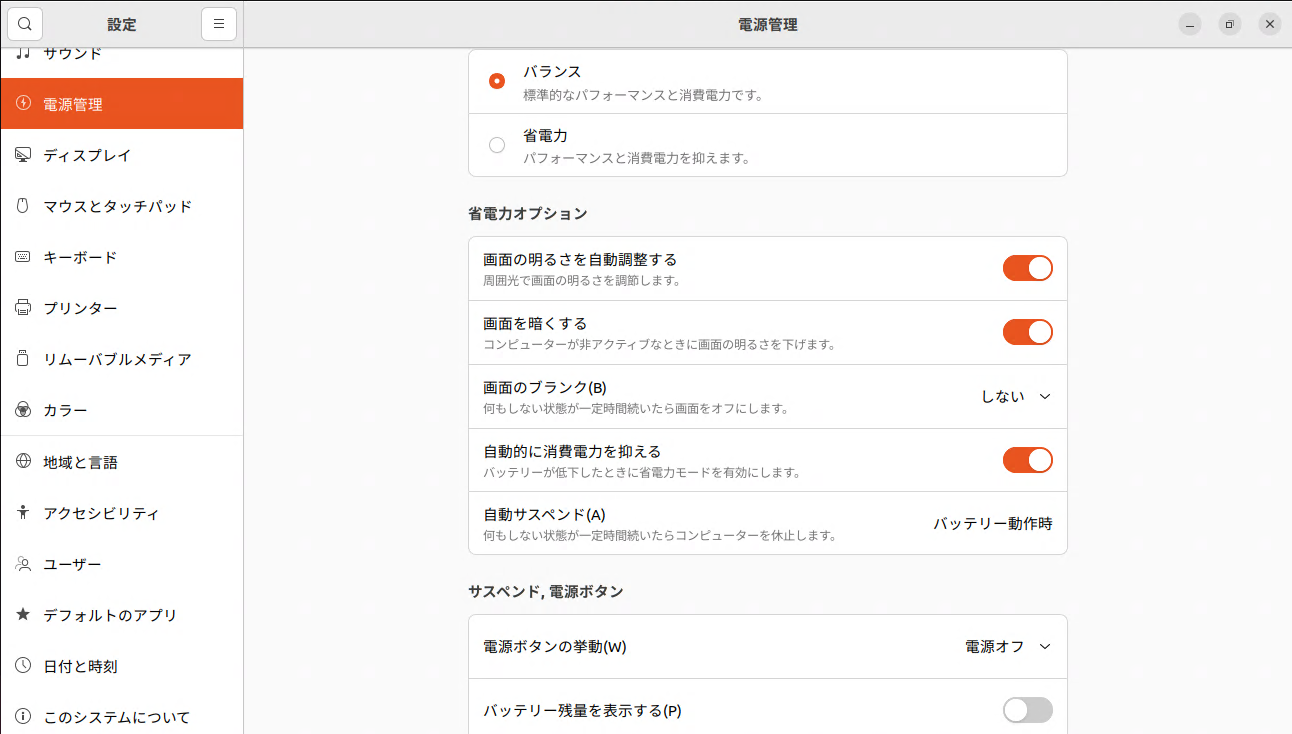
設定上は、「画面のブランク」を「しない」にしておかないといけません。(ブランク時にリモートデスクトップに入れなくなるためです。)
In the settings, “Blank screen" must be set to “No". (This is because you will not be able to enter the remote desktop when blank.)
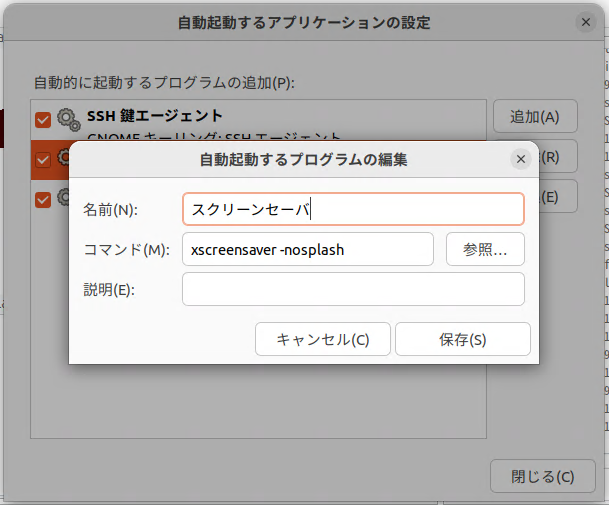
さらに、ブランクになると接続が切れるため、LCDの保護のためxscreensaverを使いましょう。以下のようなコマンドで、インストールします。
Additionally, use xscreensaver to protect your LCD, as it will disconnect when blanked. Install with a command like the following.
$ sudo apt install xscreensaver xscreensaver-data-extra xscreensaver-gl-extra そして、「自動起動するアプリーションの設定」で以下の様に項目を追加して、スクリーンセーバーが効くようにしておきます。
Then, add the following items in “Auto-start application settings" so that the screensaver works.
xscreensaver -nosplash
 2.2.4.Javaを動作させるための、openjdkのインストールと利用バージョンの選択
2.2.4. Installation of openjdk and selection of version to use for Java
マインクラフトサーバのJavaの種類などによって、JDKのバージョンが違うものを要求される場合があります。そのため、まず以下のコマンドで、openjdkのどのバージョンがインストールできるかを確認しておきます。
A different version of JDK may be required depending on the Java type of the Minecraft server. Therefore, first check which version of openjdk can be installed with the following command.
$ sudo apt search openjdk-.*-jdk$このコマンドの結果は以下のような形式で出てきます。
The result of this command will appear in the following format:
openjdk-8-jdk/xenial-updates,xenial-security 8u252-b09-1~16.04 amd64
OpenJDK Development Kit (JDK)
・・・・
実際にマインクラフトサーバ本体を動かしたときに、Javaのバージョンエラーが出る場合は、必要なopen-jdkをインストールして、切り替えて使えばよいです。
If you get a “Java version error" when you run the Minecraft server, I think you should install the necessary open-jdk and switch to it.
今回の場合は必要だったopen-jdkのバージョンは17であったので、以下のコマンドを使ってインストールしました。
In this case, it was necessary “The version of open-jdk was 17", so I installed it using the following command.
$ sudo apt install openjdk-17-jdk ほかのバージョンが必要になった場合には、さきほど確認したときの結果を見て、同じようにopen-jdkをインストールします。そして、以下のコマンドで動作すべきバージョンを選択することができます。
If you need another version, look at the results of the previous check and install open-jdk in the same way. Then you can select the version that should work with the following command:
$ sudo update-alternatives –config java3.マインクラフトサーバspigotのビルドによる取得
3. Obtained by building the minecraft server spigot
マインクラフトサーバにspigotを選びました。たどり着くまでいろいろ試しました。あとでMiutiverse coreなどのPluginを入れます。craftbukkitは重いらしいとの噂があります。mohistはModとPlugin使えると聞いていますが、最新になるのに時間がかかるので開発版になってしまい。Pluginでエラーを起こしました。paperは軽いので良いとの噂ですが、これもPluginでエラーを起こしてしまいました。
I chose spigot for minecraft server. I tried many different types of servers until I got there. I will add the ”Mutiverse core" etc. as plugin later. Rumor has it that the craftbukkit is heavy. I heard that mohist can use Mods and Plugins, but it takes time to update, so it’s a development version,and I got an error in the plugin using this server. It is rumored that paper is good because it is light, but this also caused an error with Plugin.
3.1.spigotのビルド
3.1. build spigot
適当なフォルダ(build.spigot156)などを作ります。私は自分のホームフォルダ上に作りました。
Create a suitable folder (build.spigot156). I made it on my home folder.
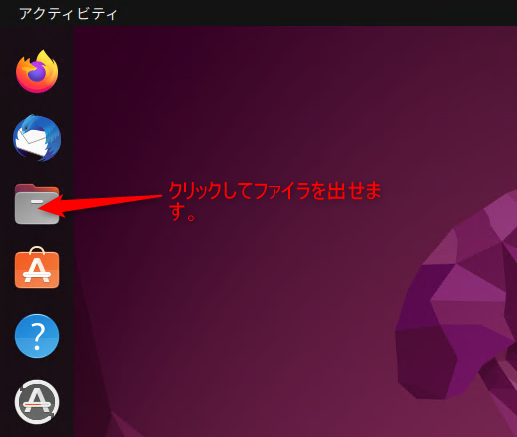
フォルダ(ディレクトリ)を操作するなら、デスクトップでファイラを使いましょう。リモートデスクトップがもう出来るようになっているならサーバのフタを閉じていいんですし、そんなに便利なところにそれを置いておく必要はありませんので、それなりの場所に置いておけばいいのです。自分のメインのパソコンからmRemoteNGを使って楽に操作して下さい。
If you want to work with folders (directories), use a filer on your desktop. If the remote desktop is already ready, you can close the lid of the server, and you don’t need to put it in such a convenient place, so just put it in a suitable place. Operate comfortably using mRemoteNG from your main computer.
以下のJenkinsのサイト(Webページ)から、firefox等を使って、最新ビルドのBuildTools.jarをダウンロードします。
Download BuildTools.jar of the latest build from the following Jenkins site (web page) using firefox, etc.
https://hub.spigotmc.org/jenkins/job/BuildTools/
先ほど作った「build.spigot156」フォルダに、端末のカレントディレクトリ(つまりコマンド実行時に、参照する現在のディレクトリ)を指定して、BuildTools.jarを動かします。例えば私は、自分のホームディレクトリ上にbuild.spigot156ディレクトリを作って、BuildTools.jarをそこに入れましたので、以下のようにコマンドを打って実行します。
Run BuildTools.jar by specifying the current directory of the terminal (that is, the current directory to be referenced when executing the command) in the “build.spigot156" folder created earlier. For example, I created a build.spigot156 directory in my home directory and put BuildTools.jar into it, so I typed the command below to execute it.
$ cd ~/build.spigot156
$ java -jar BuildTools.jar –rev 1.19.3
このコマンドでspigot-1.9.3.jar がビルド(生成)されます。
This command builds (generates) spigot-1.19.3.jar.
4.サーバの起動と、プラグインの設置
4. Starting the server and installing plug-ins
次に、実際にサーバを動かすディレクトリを作って下さい。私は自分のホームディレクトリに「minecraft」という名前のディレクトリを作り、更にその上に「spigot-1.19.3」というディレクトリを作りました。
Next, create a directory to actually run the server. I created a directory named “minecraft" in my home directory and a directory named “spigot-1.19.3" above it.
そうしたら、spigot-1.19.3.jarをこのディレクトリにコピーしてください。Modやplugin を置く前に、一度このサーバプログラムを動かして初期状態のファイルやディレクトリ等を作らせます。私はホームディレクトリの上の「minecraft/spigot-1.19.3」ディレクトリにこのサーバを置いて動かすので、以下のようにコマンドを打てばいい事(つまりspigot-1.19.3.jarを実行する事)になります。
Then copy spigot-1.19.3.jar into this directory. Before placing mods and plugins, run this server program once to create initial files and directories. I will put this server in the “minecraft/spigot-1.19.3" directory above my home directory for running it, so all I have to do is type the following command (that is, execute spigot-1.19.3.jar) .
$ cd ~/minecraft/spigot-1.19.3
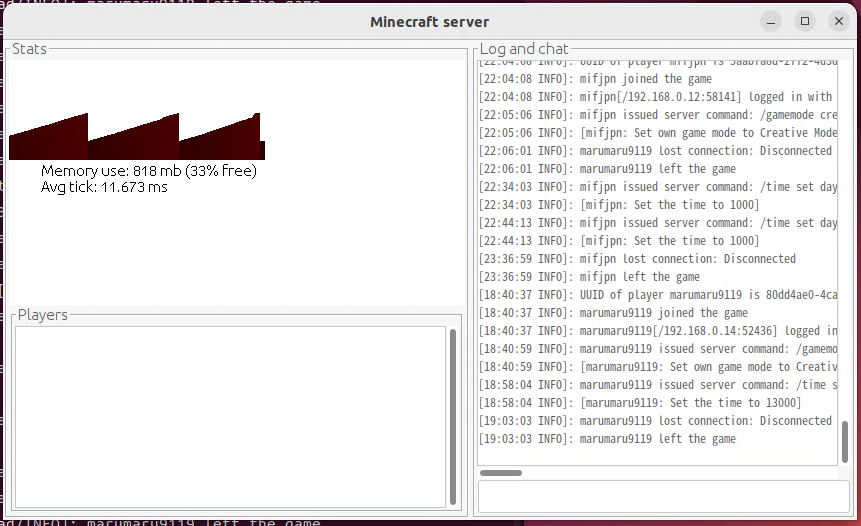
$ java -Xms1G -Xmx4G -jar spigot-1.19.3.jar これで、端末上にはこのspigotサーバのログが表示されます。さらにデイスプレイ上にgui画面(つまり以下のようなサーバのウインドウ画面)が表示されます。このサーバは一通りのworldの生成等をおこなったあとに、クライアント(つまり、マインクラフトのゲーム側)を待機します。サーバが全ての初期動作を完了した後にクライアント待に入ったら、「stop」コマンドをサーバの端末に打ち込んで終了させます。
Now you can see the log of this spigot server on your terminal. In addition, a gui screen (that is, a server window screen like the one below) will be displayed on the computer display. This server waits for the client (that is, the Minecraft game side) after generating a series of worlds. Once the server has completed all initial operations and is waiting for the client, type a “stop" command on the server’s terminal to stop it.
4.0.1. 「You need to agree to the EULA …」と表示され、spigotが終了する際の措置
4.0.1. Measures to be taken when “You need to agree to the EULA …" is displayed and spigot is terminated
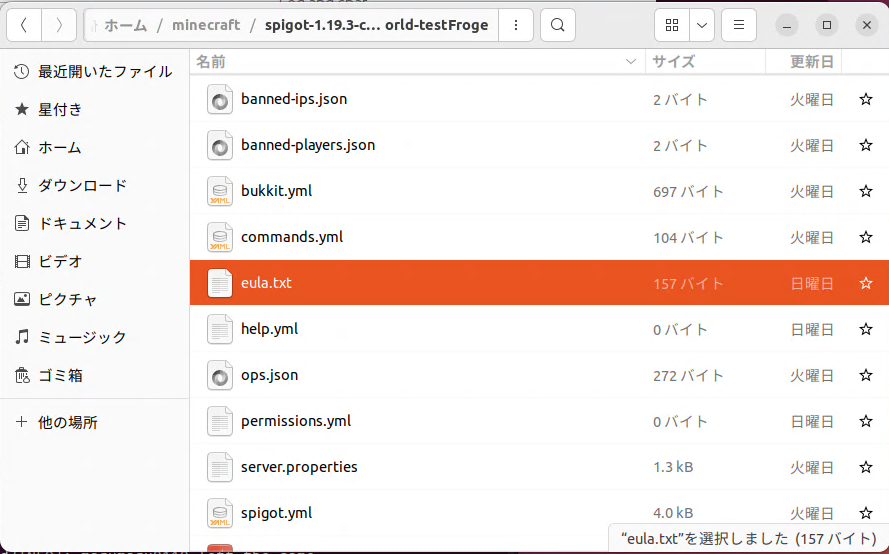
デスクトップ上で、ファイラを開きspigot-1.19.3.jarが置いてあるディレクトリを開いて見てください。eula.txtがありますので、ダブルクリックしてください。エディタが起動します。そこで、「eula=false」を、「eula=true」に書き換えてください。利用規約に同意したことになります。詳しく利用規約を読みたい人は「EULA(利用規約)」を見てください。
On your desktop, open the filer and open the directory where spigot-1.19.3.jar is located. There is eula.txt, so double click it. The editor will launch. Therefore, replace “eula=false" with “eula=true". You agree to the terms of use. If you want to read the terms of use in detail, please see “EULA (terms of use)".
4.0.2.spigotサーバのためのファイアウォール設定
4.0.2. Firewall configuration for spigot server
spigotサーバのためのファイアウォール設定をします(許可)。ポート番号は25565です。以下のようにコマンドを打ち込みます。
Configure the firewall settings for the spigot server (allow). The port number is 25565. Type the command as follows.
$ sudo ufw allow 25565
$ sudo ufw reload
4.1.プラグインの導入
4.1. Plug-in installation
4.1.1.worldedit-bukkitの設置
4.1.1. Install worldedit-bukkit
まず、以下のウェブページからspigotのバージョンに対応している。worldedit-bukkit をダウンロードします。今回は1.19.3でしたので、現在時点で「worldedit-bukkit-7.2.13.jar」をダウンロードしました。このファイルをspigot-1.19.3.jarの入っているディレクトリ上の「plugins」ディレクトリにコピーします。ここで本来であれば一度、spigotサーバを起動してworldedit-bukkitの初期的なディレクトリやファイル等の用意をさせるといいとも思いました。しかし、他のプラグインも入れてからでも問題がなさそうなので、次に進みたいと思います。
First of all, the following web page,Download worldedit-bukkit that corresponds to the version of spigot. The version is 1.19.3, so I downloaded “worldedit-bukkit-7.2.13.jar" at this time. Copy this file into the “plugins" directory in the directory containing spigot-1.19.3.jar. Here, I thought it would be better to start the spigot server once and prepare the initial directory and files of worldedit-bukkit. However, since there seems to be no problem, even to start spigot after installing other plug-ins, I would like to proceed to the next step.
WorldEdit for Bukkit
4.1.2.Multiverse-Core,Multiverse-Potalsの設置
4.1.2. Installation of Multiverse-Core and Multiverse-Potals
Multivirse-Coreは以下のウェブからダウンロードします。
Download Multivirse-Core from the following website.
https://www.curseforge.com/minecraft/bukkit-plugins/multiverse-core/download
今現在のファイルは「Multiverse-Core-4.3.1.jar」でした。このファイルもspigot-1.19.3.jarの入っているディレクトリ上の「plugins」ディレクトリにコピーします。
The current file was “Multiverse-Core-4.3.1.jar". Copy this file too to the “plugins" directory in the directory containing spigot-1.19.3.jar.
Multiverse-Potalsは以下のウェブページからダウンロードします。
Download Multiverse-Potals from the following web page.
https://www.curseforge.com/minecraft/bukkit-plugins/multiverse-portals
今現在のファイルは「Multiverse-Potals-4,2.1.jar」です。これも他のプラグインと同じように、spigot-1.19.3.jarの入っているディレクトリ上の「plugins」ディレクトリにコピーします。
The current file is “Multiverse-Potals-4,2.1.jar". Copy this to the “plugins" directory in the directory containing spigot-1.19.3.jar similar to other plugins.
4.1.3.CrackShotの設置
4.1.3. Installation of CrackShot
このプラグインは、銃を追加するためにあります。プレイスタイルの問題だと思うので、あなたがいらないと思うなら入れる必要はありません。単に私の息子が銃の使えるマルチサーバがいいと言ったので入れただけです。CrackShotプラグインは以下のwebページからダウンロードします。
This plugin is for adding guns. I think it’s a matter of playstyle, so if you don’t want it, you don’t need to include it. I just put it in because my son wanted a multiserver with guns. Download the CrackShot plug-in from the following web page.
https://dev.bukkit.org/projects/crackshot
ダウンロード出来るファイルは「CrackShot.jar」です。他のプラグインと同じ様に、spigot-1.19.3.jarの入っているディレクトリ上の「plugins」ディレクトリにコピーします。
The file that can be downloaded is “CrackShot.jar". Just like any other plugin, copy it to the “plugins" directory in the directory containing spigot-1.19.3.jar.
どうやらCrackShotは、古くて新しいプラグインのようです。マインクラフトクライアント側でforgeを使って、Optifineをいれ、更に銃の表示用のリソースを入れます。その際、手づくりのリソースとサーバ側の設定ファイルを合わせることによってカスタマイズできるという、なかなか濃い趣味のようです。今回1.19.1用のリソースパックに、ほぼサーバ側のファイルも付いているようなものを見つけたので、とりあえず導入しました。
Apparently CrackShot is an old and new plugin. Use forge on the Minecraft client side, install Optifine, and then add resources for displaying guns. And,we can be customized by matching handmade resources and server side configuration files. It is for the deepen hobbyist. This time, I found a resource pack for 1.19.1 that almost has server-side files. I think that is convenient to try it, so I installed it.
ただし、名前は似ているCrackShotPlusの導入を考えているなら、利用は止めるべきだと考えます。それには後方互換性が無いとネットで調べがついています。
However, if you are thinking of introducing CrackShotPlus, which has a similar name, I think you should stop using it. It is checked on the net that there is no backward compatibility.
参考:Why can’t crackshot /shot config reload
4.1.3.1.今まで入れたプラグインの初期化と調整
4.1.3.1. Initialization and adjustment of installed plugins
ここで、いったんspigotを実行させて、プラグインを初期化(初期的なディレクトリやファイルなどをつくってもらい)しましょう。私はホームディレクトリの上の「minecraft/spigot-1.19.3」ディレクトリにこのサーバを置いて動かすので、以下のようにコマンドを打てばいい事(つまりspigot-1.19.3.jarを実行する事)になります。
Now run spigot once to initialize the plugin (create initial directories and files). I puted this server in the “minecraft/spigot-1.19.3" directory above my home directory. So I just type the following command (that is, execute spigot-1.19.3.jar ).
$ cd ~/minecraft/spigot-1.19.3
$ java -Xms1G -Xmx4G -jar spigot-1.19.3.jar
つぎに、「CrackShot」のサーバ側の武器を作ります。以下のWebページから、「BASICCONFIG」ボタンを押して、「BASE CONFIG.txt」をダウンロードします。
Next, we will create a server-side weapon for “CrackShot". Download “BASE CONFIG.txt" from the following web page by pressing the “BASICCONFIG" button.
CrackShot Plugin Resource Pack 1.19.1
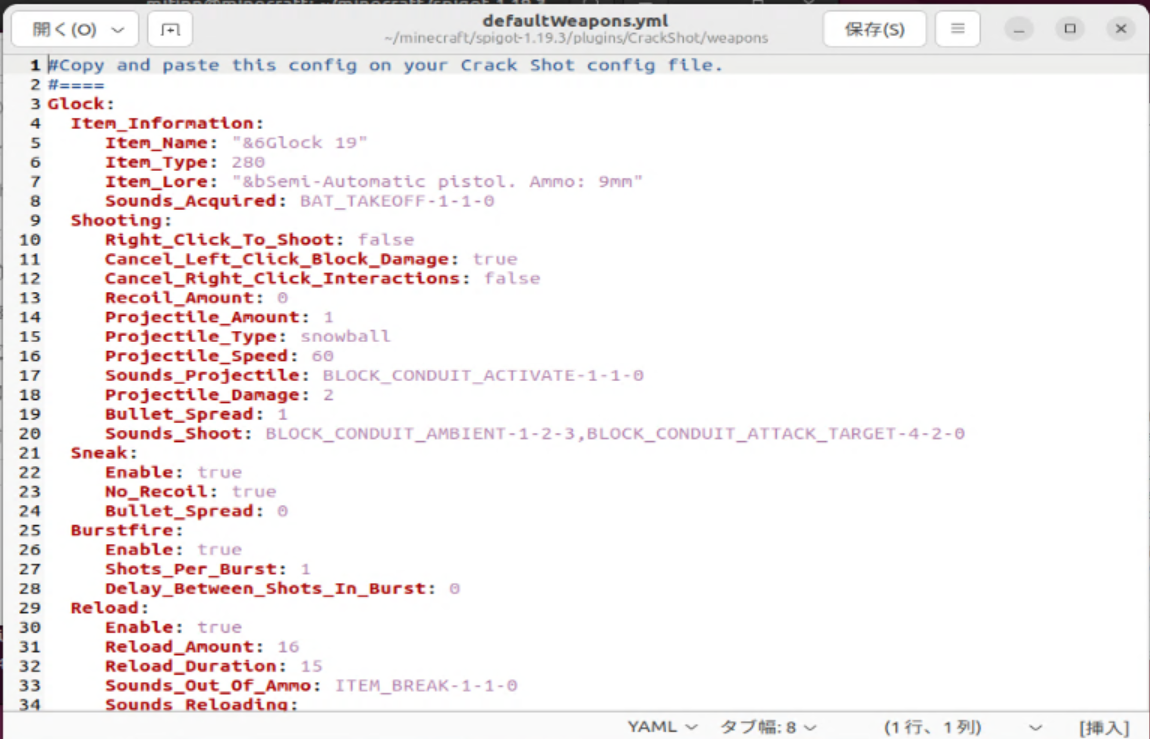
この「BASE CONFIG.txt」を、ファイラを使って「ダウンロード」ディレクトリでコピーをします。そして、「spigot-1.19.3.jar」を置いたディレクトリの中の「plugins/CrackShot/weapons/」ディレクトリの中にペーストしてください。そのディレクトリにはもともと「defaultWeapons.yml」があります。この「defaultWeapons.yml」をゴミ箱に入れましょう。そして「BASE CONFIG.txt」を名前を変更で「defaultWeapons.yml」に名前を変えてください。つまりは、「BASE CONFIG.txt」で「defaultWeapons.yml」を置き換えてくださいということです。
次に、「defaultWeapons.yml」をダブルクリックしてエディタで中身を見ましょう。1,2行目はこのファイルの説明文ですので、ymlとしては正しくありません。ですから、行の先頭に「#」をいれてください。
Copy this “BASE CONFIG.txt" in the “download" directory using a filer. And paste it in the “plugins/CrackShot/weapons/" directory in the directory where you put the “spigot-1.19.3.jar". That directory originally has a “defaultWeapons.yml". Let’s put this “defaultWeapons.yml" in the trash. Then rename “BASE CONFIG.txt" to “defaultWeapons.yml". In other words, replace “defaultWeapons.yml" with “BASE CONFIG.txt".
Next, double-click “defaultWeapons.yml" to see the contents in the editor. Lines 1 and 2 are explanations of this file, so they are not correct as yml. So put “#" at the beginning of the line
これで、CrackShotのサーバ側の設定は終わりです。ここで、クライアント側の説明もしておきます。以下のWebページをブラウザで見て「DOWNLOAD TEXTURE PACK」ボタンを押して、ダウンロードしてください。今現在は「crackshot-resources-1-19-1-finished.zip」がダウンロードできました。このファイルは、クライアントのリソースフォルダに入れて、適用してください。1.19.1用なので「本当に適用してよいか」の質問のウインドウが出ますが続けて適用しても問題はありませんでしたし、きちんと銃の表示もできました。
This completes the server-side configuration of CrackShot. Here’s a client-side explanation. View the following web page in your browser and press the “DOWNLOAD TEXTURE PACK" button to download. Right now you can download “crackshot-resources-1-19-1-finished.zip". Put this file in the client’s resource folder and apply it. Since it is for 1.19.1, a window is displayed as “Do you really want to apply it?" So, push yes button to apply it.
CrackShot Plugin Resource Pack 1.19.1
このプラグインのコマンドについては、以下のWebページを参考にしてください。
For the commands of this plugin, please refer to the following web page.
spigot1.19.3-crackshot-crackshot-texture1.19.1での、PVP自宅サーバめも

4.1.4.Multivirse-Coreの場合(途中で、MGS4.0を入れます)
4.1.4.For Multivirse-Core(In the middle, insert MGS4.0)
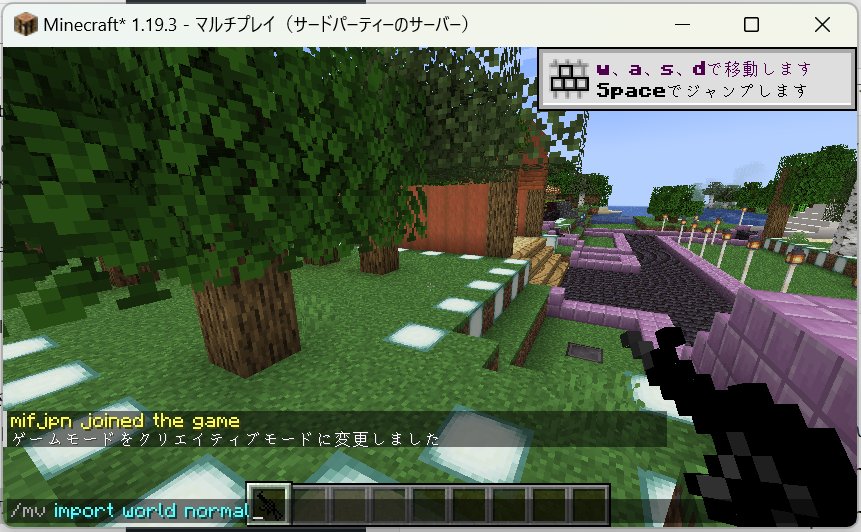
クライアント側(つまりマインクラフトの接続をするほう)で、Multiverse coreで初めのスポーンポイントである、worldをimportして、初期化します。(これをしないと、MGS4.0のdatapackが入れられません。)サーバを以下のコマンドで起動します。
$ cd ~/minecraft/spigot-1.19.3
$ java -Xms1G -Xmx4G -jar spigot-1.19.3.jar
次にクライアントを起動してこのサーバに接続し、「/mv import world normal」と打ち込めばいいはずです。この操作が終わって接続を切ったら。
サーバの端末に「stop」を打ち込みきちんと終了させます。ターミナルのコマンド要求の「…$」が出るまで待ってください。(出ないときはエンターを押してみましょう。)
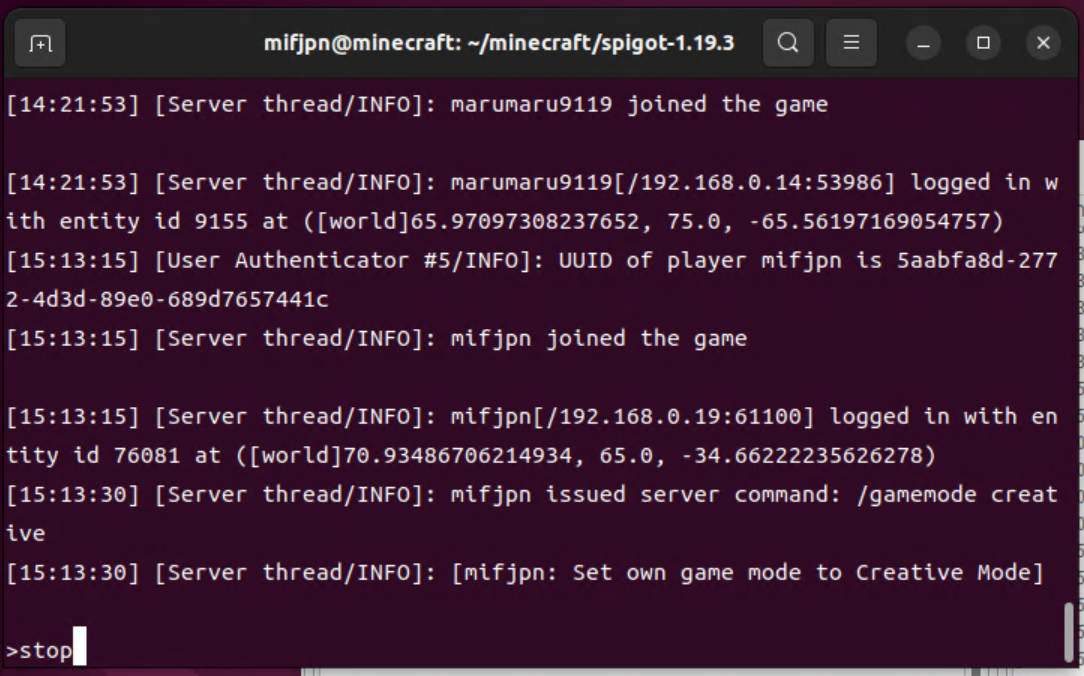
On the client side (that is, the one that connects to Minecraft), import and initialize the world, which is the first spawn point in the Multiverse core. (If you don’t do this, MGS4.0 datapack can’t be installed.) Start the server with the following command. Then you should start your client, connect to this server, and type “/mv import world normal". After this operation is completed, at second, you disconnect from the server. Type “stop" to the server,and you must finish server connection(s) correctly.Wait until the command request “…$" in the terminal appears. (If it doesn’t appear, press enter.)
※つぎに、サーバ上で、MGS4.0のデータパックを入れます。以下のYOUTUBEページの概要欄の「Datapack (1.19.3):」からダウンロードしてください。今現在は、「MGS_4.1.2_datapack.zip」が手に入りました。
https://www.youtube.com/watch?v=Ia5Mlkn6ipM
*Next, put the data pack of MGS4.0 on the server. Please download from “Datapack (1.19.3):" in the summary column of the following YOUTUBE page. Now I could download “MGS_4.1.2_datapack.zip".
https://www.youtube.com/watch?v=Ia5Mlkn6ipM
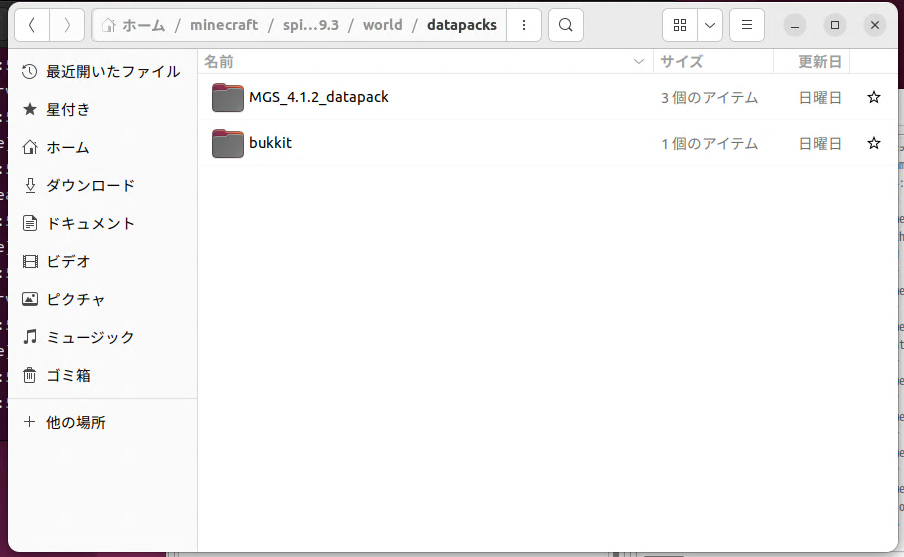
ファイラ上でダブルクリックし展開します。展開後のフォルダを、「spigot-1.19.3.jar」のあるディレクトリ(私の場合は、~/minecraft/spigot-1.19.3/です。)の中にある、「world」ディレクトリの中の「datapacks」の中にコピーします。
Double-click on the filer to expand it. Copy the unzipped folder to “datapacks" in the “world" directory in the directory with “spigot-1.19.3.jar". (In my case, the directory with “spigot-1.19.3.jar" is ~/mincraft/spigot-1.19.3/.)
Multivirse-coreを使った場合、最初にキャラクタがスポーンする「world」というディレクトリが設定の基本になっています。ですから、データパックもそこに置くことで、全世界に効き目があることになります。(そのため、最初にworldをimportすることが必要なようです。)Multivirse-coreのコマンドは以下のWebページに書いてありますので参考にしてください。
プラグイン解説:Multiverse-Core
When using Multivirse-core, the basic configuration is a directory called “world" where characters first spawn. So by putting the data pack there as well, it works for the whole world. (Therefore, it seems necessary to import world first.) The Multivirse-core command is written on the following web page, so please refer to it.
Plugin Explanation: Multiverse-Core
また、Multivirse-coreで作った世界を行き来できるポータルを作れる、Multivirse-Potalsのコマンドについては、こちらのWebページが参考になるでしょう。
マルチワールド対応のポータル移動プラグイン
ワールドのデータパックとして入れるので、話の途中でMGS4.0を入れることになっています。もし、銃がいらなければ入れなくても構いません。(ひとまずは、データパックをMultivirseでどう使うのかがわかりました。)クライアント側でのMGS4.0の対応は、さきほどのYOUTOUBEの概要欄の「Resource Pack (1.19.3):」から、Resourceをダウンロードしてクライアントに入れることです。
MGS4.0のYOUTUBE説明ページ:
https://www.youtube.com/watch?v=Ia5Mlkn6ipM
Since it will be included as a world data pack, MGS4.0 is supposed to be included in the middle of the story. (If you don’t want a gun, you don’t have to put it in. For the time being, I learned how to use the data pack with Multivirse.)
For the support of MGS4.0 on the client side, see “Resource Pack (1.19.3):" in the summary column of YOUTUBE.
Download it and put it in your client resource directory, and apply it.
*MGS4.0 YOUTUBE description page:
https://www.youtube.com/watch?v=Ia5Mlkn6ipM