古いパソコンのちょっと使いや、マイクラサーバ等の各種サーバにも活躍:UBUNTU Linuxのインストール方法(Useful for a little use of old personal computers and various servers such as Minecraft servers: How to install UBUNTU Linux)
これから、ずんだもんのページを間借りして、こちらでないように触れた部分もYOUTUBEで妖精の中田さんのチャンネル分室で取り上げてもらうようにします。
From now on, I will use Zundamon’s blog page as my main YouTube link.That’s how I’m going to have it featured on Fairy Nakata’s channel branch.
では、UBUNTU Linuxの紹介とインストールの仕方を説明します。
Now, I will introduce UBUNTU Linux and explain how to install it.
0.UBUNTU Linuxとは?(読み飛ばしてもいいです。)
0. What is Ubuntu Linux?(It’s historical, so you can skip to read this chapter,if want.)
Linuxの源流はリーナス・トーバルスさんが、そのころインターネット等の構築の源流となったUNIXの核となる部分(カーネル)を、自分で作り上げたことから始まります。
The origin of Linux begins when Mr. Linus Torvalds created the core part (kernel) of UNIX, which was the origin of construction of the Internet, etc. at that time.
そして、そのころ、ヒッピー文化の影響もうけたかもしれないというリチャード・ストールマンはCopy leftという権利とともに、FSF(Free Software Foundation)を(最終的に)作りました。それは、ソースコードの自由配布とともに、バイナリ(実行可能なファイル等)を媒体部分のお値段以外フリーで受け渡さねばならないという、幾分アグレッシブなライセンスです。
And around that time, Richard Stallman, who may have been influenced by hippie culture, (finally) created the FSF (Free Software Foundation) with the right to copy left. It’s a somewhat aggressive license that requires free distribution of the source code and the free distribution of the binaries (executable files, etc.) except for the price of the media.
両方が合わさって、GNU/Linuxが正式名称だとストールマンは言いますが、リーナスはもっと商用の利用すら許したいようです。(ただし、ソースコードなどについては、他者の(自己的な部分も含めて)研究や改良の自由はあるべきで、商用利用のために隠されることを好むものではないと思います。)
Combined, GNU/Linux is the official name, Stallman says, but Linus wants to allow even more commercial use,I think. (However, regarding the source code, etc., there should be freedom for others to research and improve it (including in their own part), and I don’t think he likes it to be hidden for commercial use. )
その1つの流れをくむDebian Linuxをもとに、たくさんの使いやすいアプリとともに個人利用での無料利用の自由、ライセンス付き有料商用利用も考えに入れて、マーク・シャトルワースがCanonicalという会社で発表しているのが、UBUNTU Linuxということになります。
UBUNTU was created based on Debian Linux, which is one such trend of GNU/Linux. Free freedom for personal use as well as paid commercial use with a license are included, along with many easy-to-use apps. Mark Shuttleworth releaces it at a company called Canonical. That’s UBUNTU Linux.
1.UBUNTUを入れることのできるパソコンの最小スペックはどのくらいか?
1. What are the minimum specs of a PC that can run UBUNTU?
ーーー
2 GHzデュアルコアプロセッサ以上
4 GBシステムメモリ
25 GBのハードドライブ空き容量
DVDドライブまたはUSBポート(インストールメディアとして使用)
インターネットアクセス(推奨)
ーーー
2 GHz dual-core processor or higher
4 GB system memory
25 GB free hard drive space
DVD drive or USB port (used as installation media)
Internet access (recommended)
ーーー
以上のスペックのおかげで、実はCore 2 Duoのノートパソコン(WiFi接続)で動くことができます。例としては家族用としてちょっと使いのWeb閲覧やOfficeとかのワープロでの利用です。ただし、HDDでは遅すぎるのでSSDにしないといけません。また、RAMを4GBにしなけれないけません。その動作はややゆっくり目ですが、YOUTUBE動画がカクカク動くなどといったことはありません。
Since the above specs are the minimum, it can actually run on a Core 2 Duo laptop (WiFi connection). For example, for family use, it is used for web browsing and word processors such as Office. However, HDD is too slow, so we have to use SSD. Also, the RAM must be above 4GB. The application is a little slow, but it make YouTube videos run smoothly at full screen.
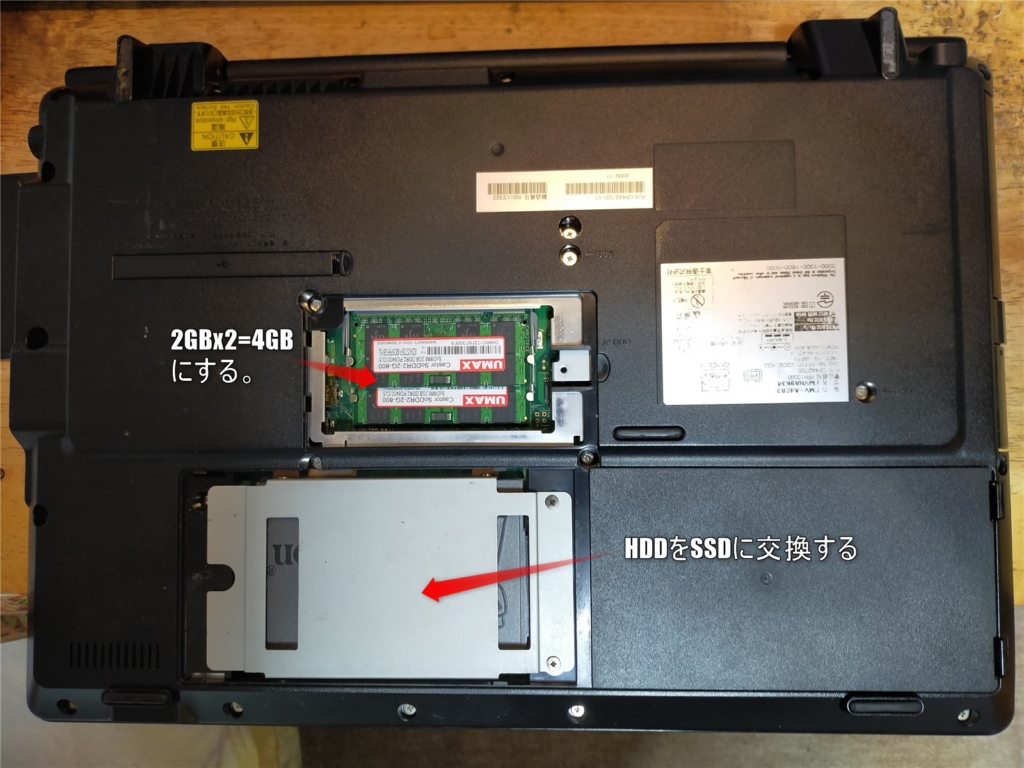
私の自宅のWebサーバ・ファイルサーバ・Mincraftサーバは、実際にUBUNTUをOSに使って動いています。只なので、みなさんも使ってみましょう。
My home web server, file server, and Mincraft server are running using Ubuntu as the OS. It’s free, so let’s all use it.
2.インストールの仕方は2種類あります。
2. There are two ways to install.
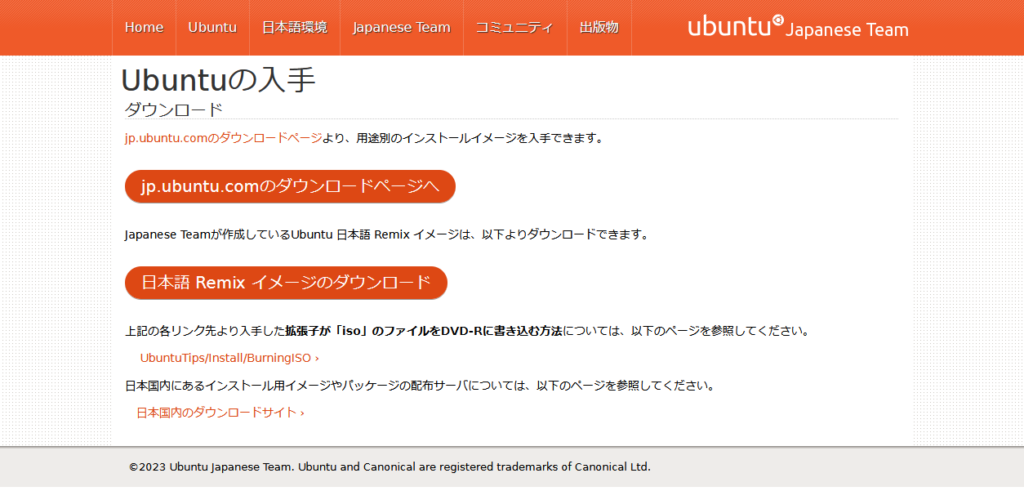
インストール用のisoファイルをダウンロードすることからすべては始まります。世界的にはCanonicalのページから、日本の場合は日本チームが作った日本語Remixのページからのダウンロードをお勧めします。
It all starts with downloading the installation iso file. We recommend downloading from the Canonical page in worldwide, and from the Japanese Remix page made by the Japanese team in Japan.
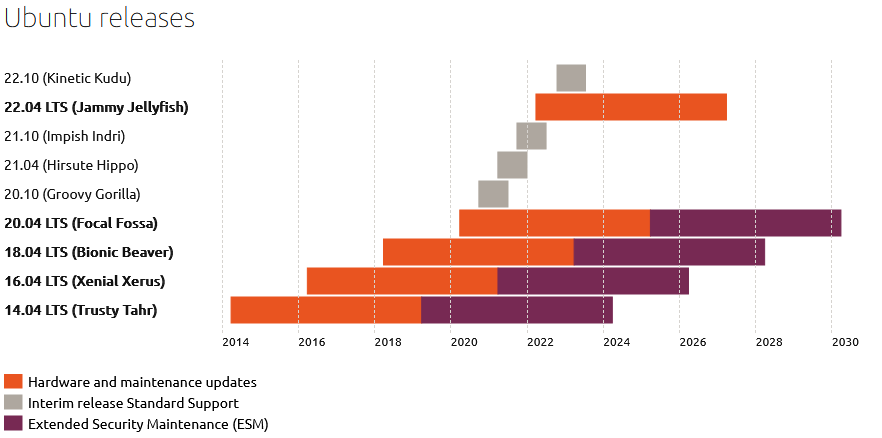
ここで、どのバージョンをダウンロードすればいいのかを知っておいてください。UBUNTUは毎年の4月と10月にリリースされます。しかし、それらの多くは少しの間しかアップデートを受けられません。3年おきにLTS(Long Term Support)版がリリースされます。これは、長期サポート版で5年間のアップデートを受けられます。前回のLTS版はバージョン22.04(つまり、2022年4月のリリースのもの)です。これを入れておけば、5年間は安心できるということです。
Now know which version to download. UBUNTU is released in April and October of each year. However, many of them only receive updates for a short period of time. LTS (Long Term Support) versions are released every three years. This is a long-term support version that will receive updates for 5 years. The last LTS version was version 22.04 (i.e. the April 2022 release). If you put this in, it means that you can rest assured for 5 years.
 2-1.USBメモリインストーラによるインストール方法。
2-1. How to install using a USB memory installer.
無料のWindows上のアプリのRufusで、USBメモリへの書き込みが可能です。
You can write to USB memory with Rufus, a free Windows app.
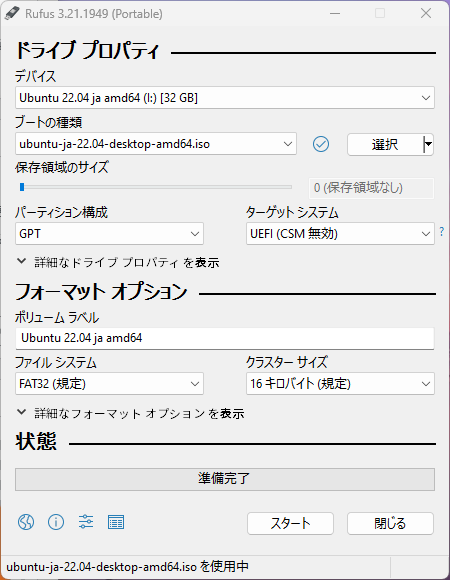 USBメモリにisoファイルを書き込めたら、USBメモリをインストールしたいパソコンに刺します。
After writing the iso file to the USB memory, insert the USB memory into the computer you want to install.
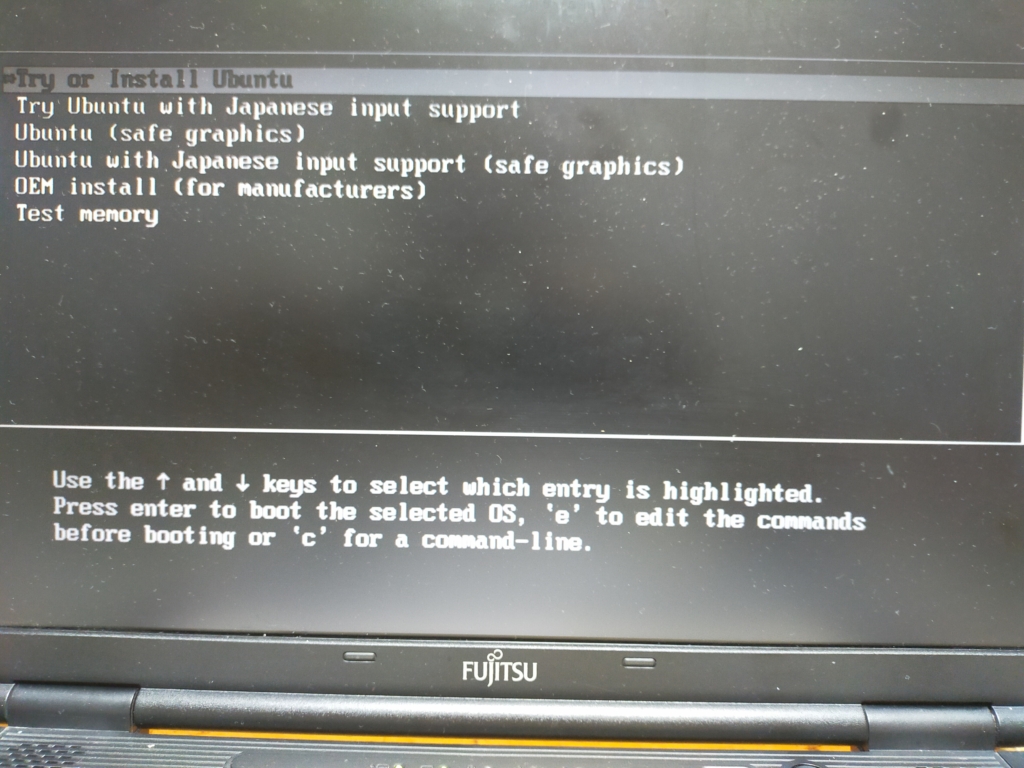
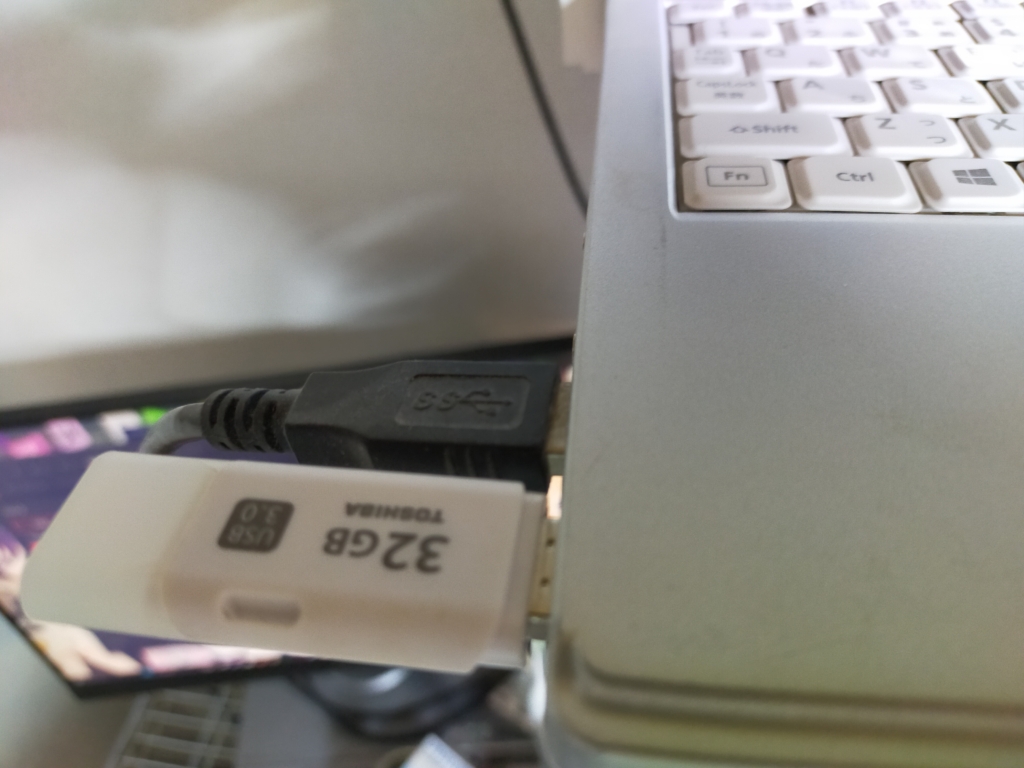 電源ボタンを押したら、起動選択を出すボタンを何度も押しながら、その画面を出してこのUSBメモリから起動します。起動選択画面に行くためのキーはF1,F2,F8,F12などやDELキーををしてBIOSで先に起動する起動するもの変えるなどいろいろなキーがあり、それぞれのパソコン(メーカー)によって違います。Googleなどで調べておくといいでしょう。最終的にこの画面が出ればいいです。
After pressing the power button, press the button that displays the boot selection many times to display the screen, and boot from this USB memory.The key to go to the boot selection screen is F1, F2, F8, F12, etc. Or you press the DEL key to change what to boot first in BIOS.There are various keys, and they are different for each computer (manufacturer).It would be a good idea to look up the key on Google or something.When this screen finally appears, you can go to the next step.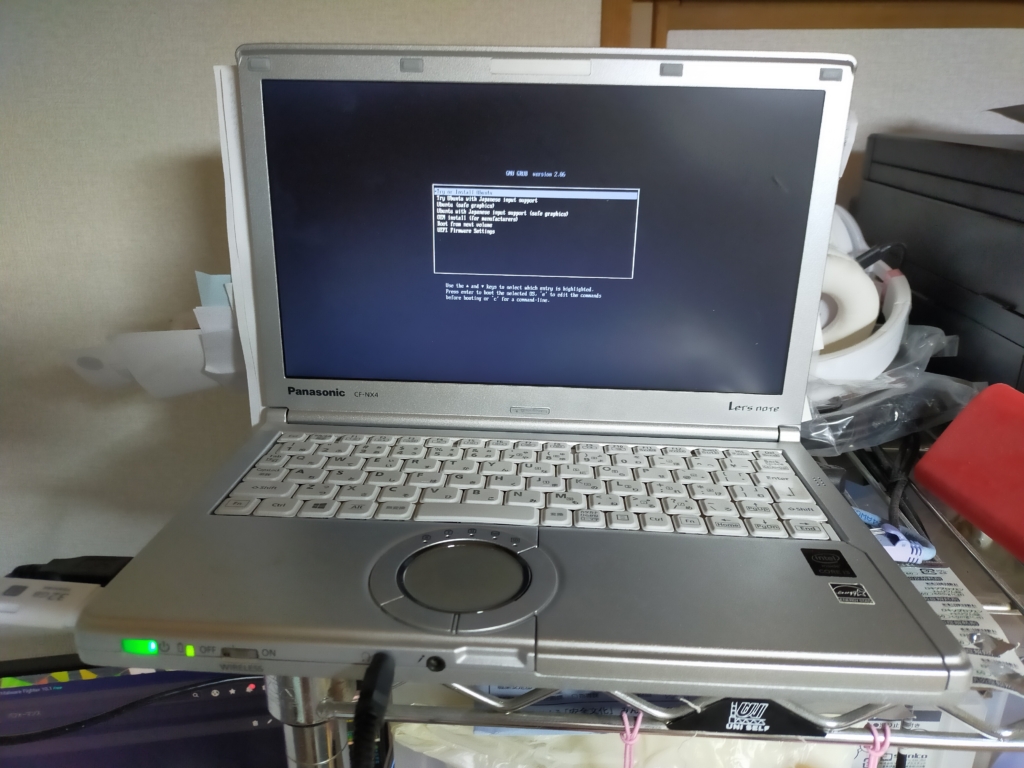 2-2.DVDインストーラによるインストール方法。
2-2. Installation method by DVD installer.
CPUがCore 2 Duoであるくらいに古いパソコンの場合は、USBメモリからでは起動しないかもしれません。その場合は、パソコンにDVDドライブがありそこからインストールします。これは、比較的遅いのですが確実な方法です。
If your computer is old to have a Core 2 Duo CPU etc., it may not boot from a USB stick. In that case, if your computer has a DVD drive I think, install it from there. This is a relatively slow but reliable method.
 Img Burnなどでフリーソフトで、インストールisoファイルをDVDに焼きます。
Burn the installation iso file to DVD with free software such as Img Burn.
そして、インストールしたいパソコンにその焼いた後のDVDを入れましょう。
Then insert the burned DVD into the computer you want to install.
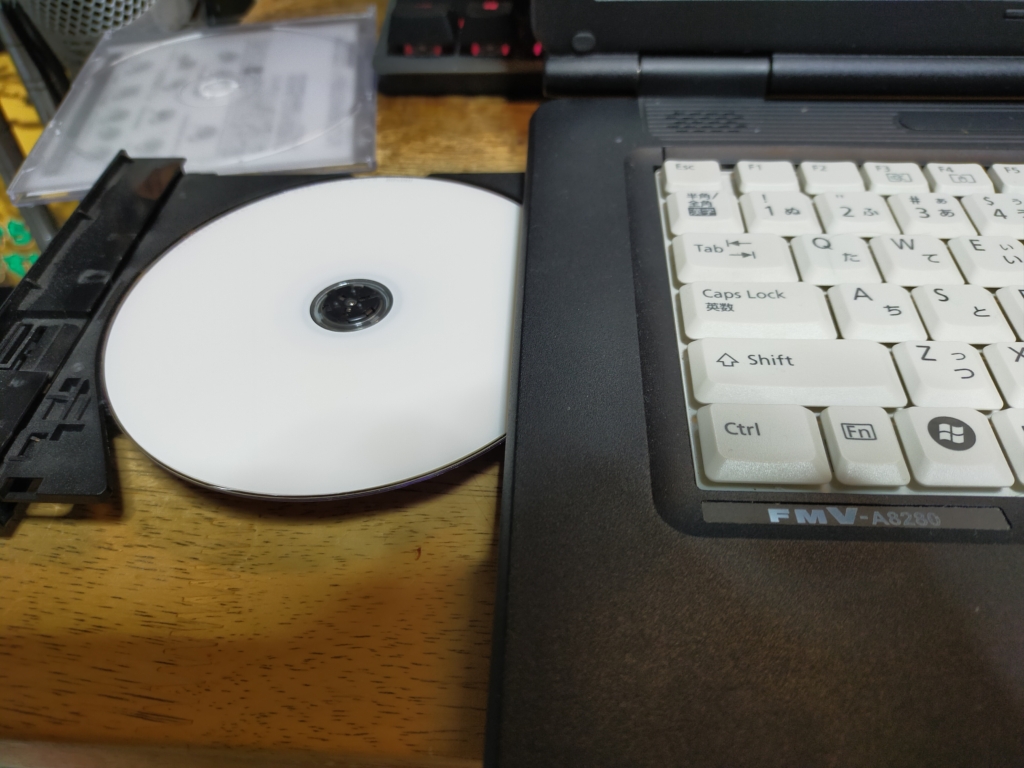 多くの古いパソコンの場合、そのままでDVDから起動すると思います。しかしそうでない場合、起動選択キーを何度も押しながら電源ボタンをおして電源を入れることで、起動するメディアを選択する必要があるかもしれません。
Many older computers will naturally boot from DVD. But if not, press the power button while holding the boot selection key repeatedly to turn it on. Doing so, You may select from DVD,and boot from it.
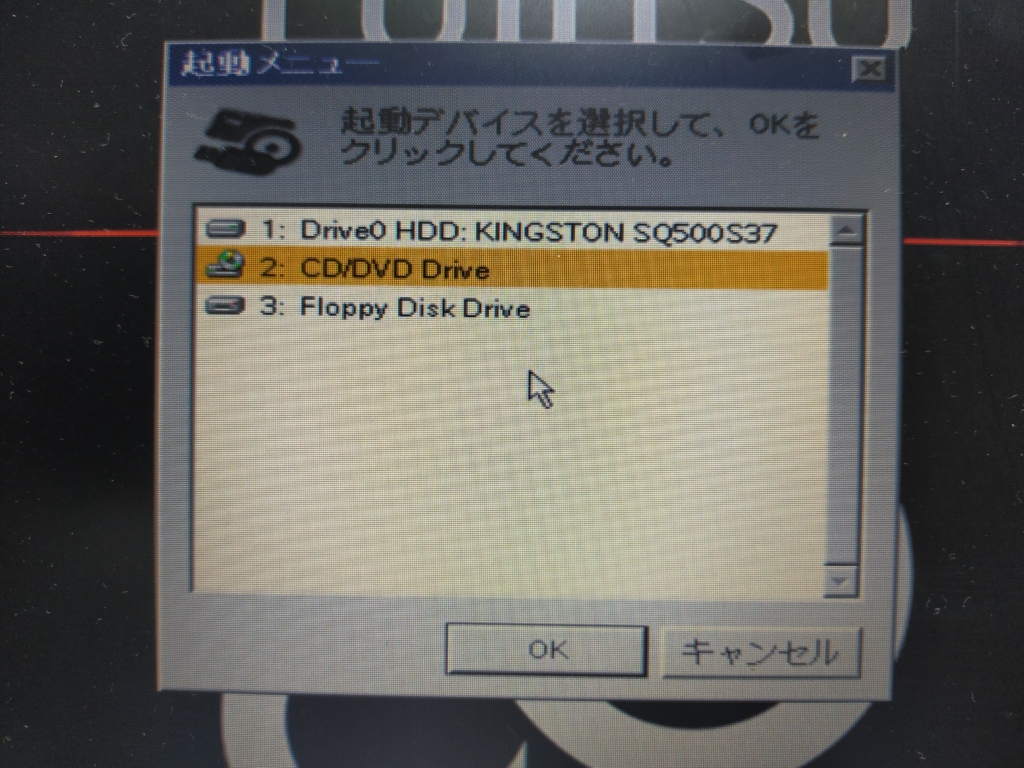 うまくDVDから起動できた場合、USBメモリインストーラーと同じ画面がでてきます。
If you can successfully boot from the DVD, the same screen as the USB memory installer will appear.
 3.インストール方法
3. Installation method
2.1,2.2の両法で、同じ画面が出ますので、ここからは同じ方法でインストールができるます。そのため説明も同じです。
The same screen will appear in both methods 2.1 and 2.2, so you can install in the same way from here. Therefore the explanation is the same.
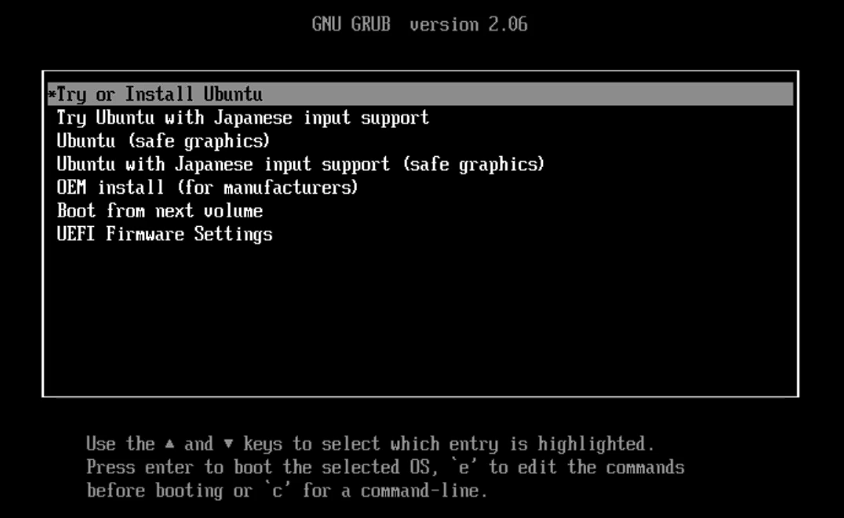
まず、「Try or Install UBUNTU」を選択してエンターキーを押しましょう。
First, select “Try or Install UBUNTU" and press the enter key.
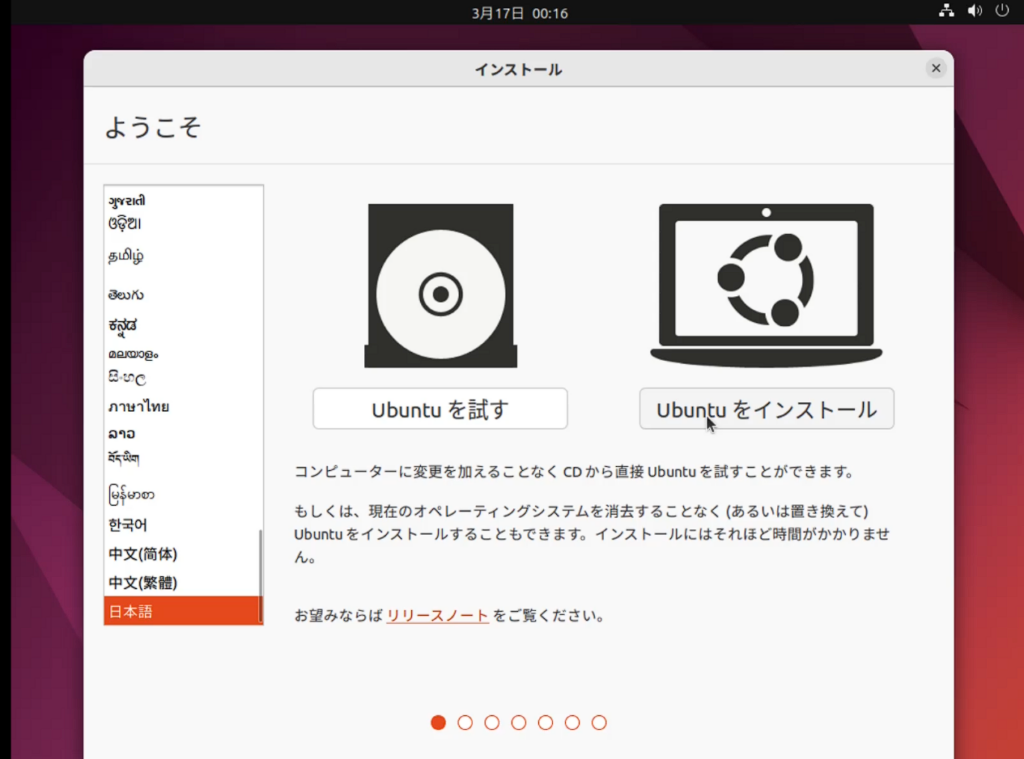
 時間がたつと、次の画面に移ります。このとき、日本語(またはあなたの母国語)を選んで、「UBUNTUをインストール」を押しましょう。
After a while, it will move to the next screen. At this time, select Japanese (or your native language) and press “Install UBUNTU".
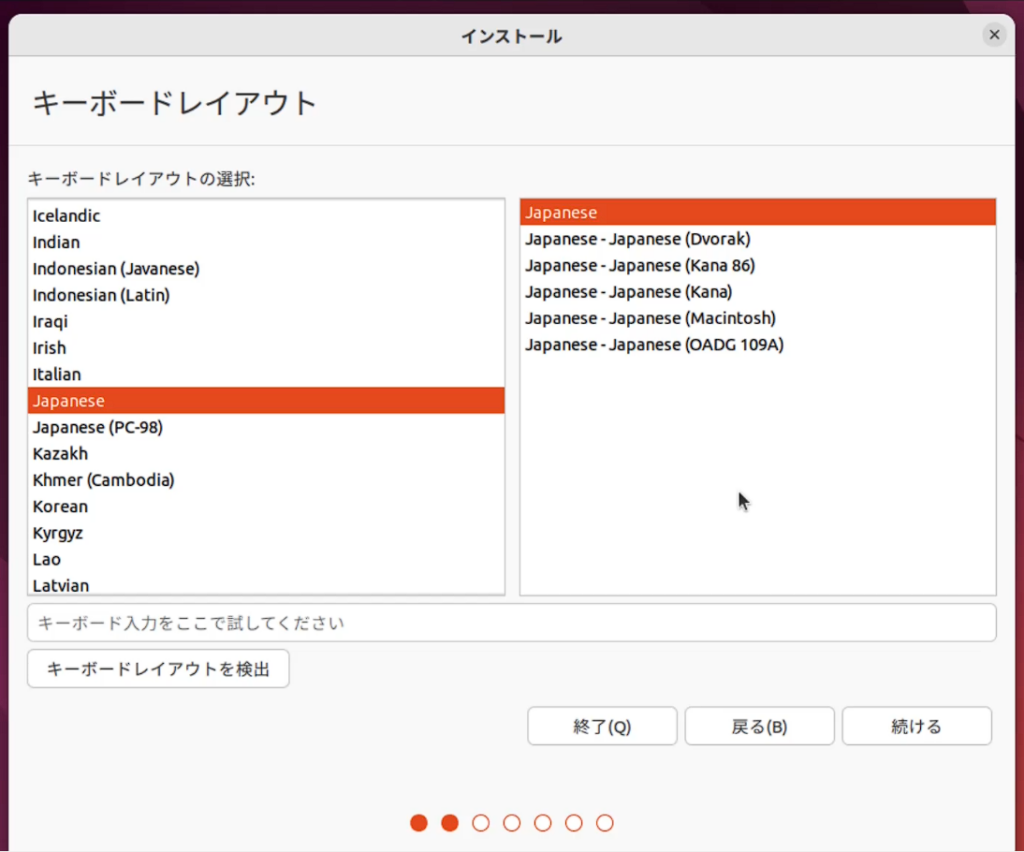
 次に、「キーボードレイアウト」のウインドウが出てきます。Japanese-Japaneseで大丈夫なので、(または、あなたの母国のレイアウトを選んでください)「続ける」を押しましょう。
Next, the “Keyboard Layout" window will appear. Japanese-Japanese is fine (or choose the layout of your home country), so let’s press “Continue".
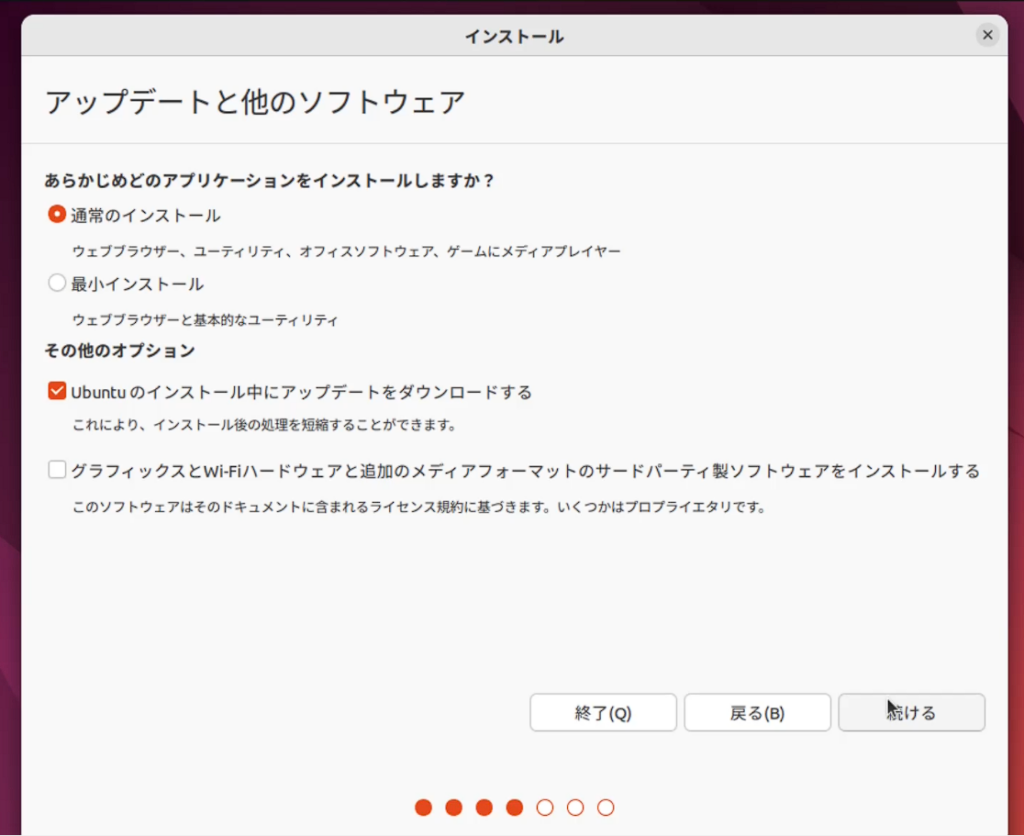
 次に出てくるウインドウは「アップデートと他のソフトウェア」です。Web閲覧やOffice機能などを使うなら、「通常のインストール」を選んで続けるを押しましょう。もし、あなたがサーバなどを作るにあたってOfficeなどがいらない場合は「最小インストール」を選ぶのも良い方法です。
The next window that pops up is “Updates and Other Software". If you want to use Web browsing or Office functions, select “Normal installation" and press continue. If you don’t need Office etc. to make a server etc., it is also a good way to choose “minimal installation".
できればここで、Lanケーブルを刺しておいてインターネットに接続できるようにしておいてください。そうすると、追加的にインストールに必要な情報を、このパソコンは得ることができます。
If possible, plug in the LAN cable here so that you can connect to the Internet. Then, this computer can obtain additional information necessary for installation.
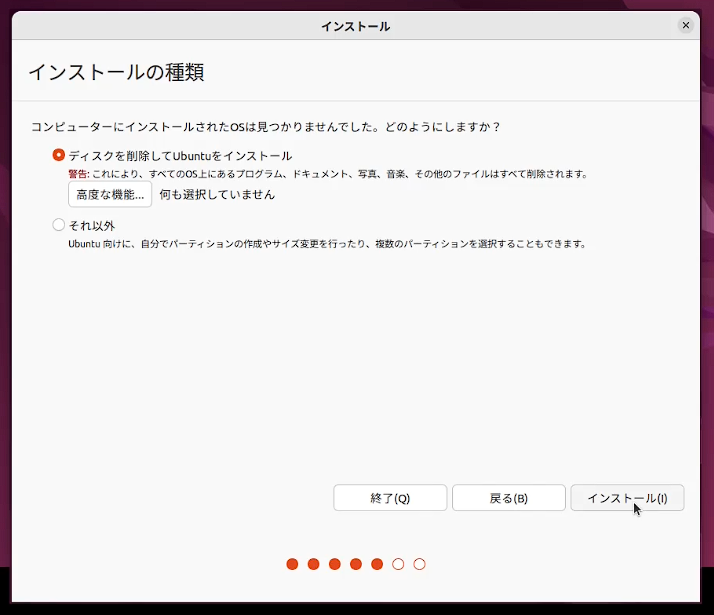
 次は「インストールの種類」のウインドウが出ます。ここでは、古くてもうWindowsなども動かないパソコンを相手にしている想定なので、「ディスクを削除してUbuntuをインストール」を選択し、インストールボタンを押します。
Next, the “Installation Type" window will appear. Here, it is assumed that you are dealing with an old computer that does not run Windows anymore, so select “Erase disk and install Ubuntu" and press the Install button.
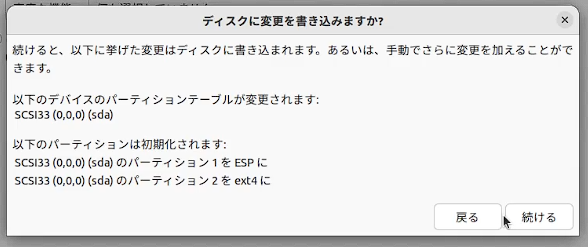
 「ディスクに変更を書き込みますか」のウインドウが開きます。通常、標準的なインストールに必要な項目のSSDのパーティション(間仕切り)ができますので、そのまま「続ける」を押せばよいです。
A window will pop up asking ”if you want to write changes to disk”. The SSD partitions are usually prepared for the items you need for the standard installation you choose. You can just press “Continue".
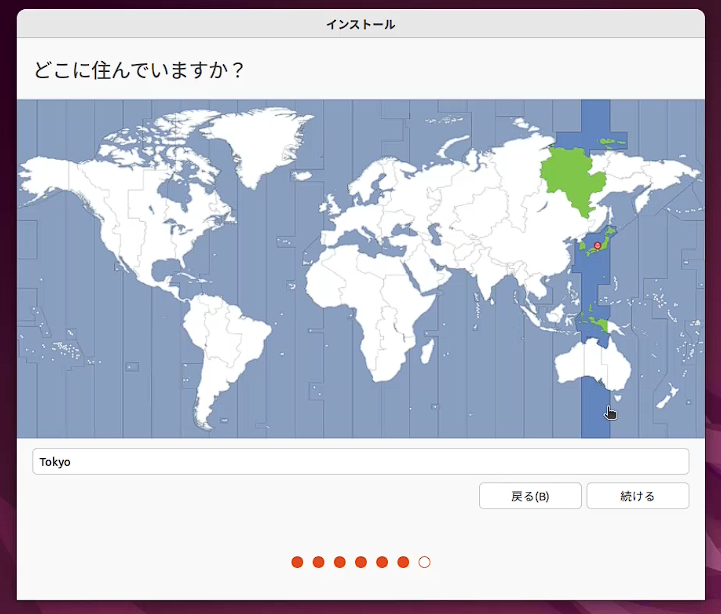
 「どこに住んでいますか?」のウインドウが開きます。これは、時刻を決めるためです。東京時間でいいので、そのまま「続ける」を押しましょう。(または、あなたの母国時間を示す場所をマップで選んで「続ける」を押しましょう。)
“Where do you live?" window opens. This is for determining the time. Tokyo time is fine, so just press “Continue". (Or, select a place on the map that shows your home country time and press “Continue".)
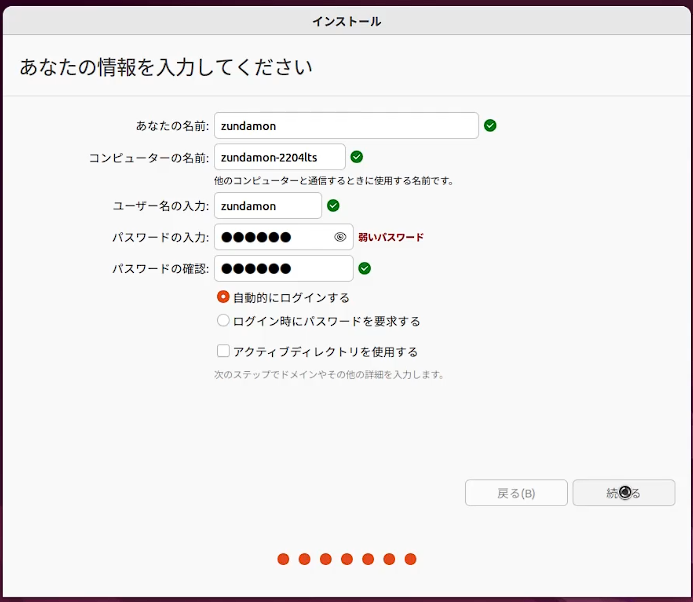
 次に出てくるのは「あなたの情報を入力してください」のウインドウです。ここではあなたがこのOS(Windowsのような基本ソフトであるUBUNTU)にログイン(起動して時に入る)名前とパスワードを設定します。「コンピュータの名前」の設定項目がありますが、これはこのパソコンからデスクトップ共有(画面の遠隔操作)などをしあ場合の呼び名になります。後でも変えられます。ですから、他のパソコンについていないような、一意な名前を付ければ何でもいいです。
The next window is the “Please enter your information" window. Here you set the login name and password for this OS (UBUNTU, which is basic software like Windows). There is a setting item for “computer name". This will be the name to call when “sharing the desktop(remote control of the screen)" etc. from this computer. You can change it later. Therefore, anything is fine as long as you give it a unique name that is not attached to other computers.
また、「ご家庭用や、サーバ用にという用途で使用する」のに、いちいちログインするのは面倒なので「自動的にログインする」を選択しておきましょう。
Also, since it is troublesome to log in each time you use it for home use or server use, select “Automatically log in".
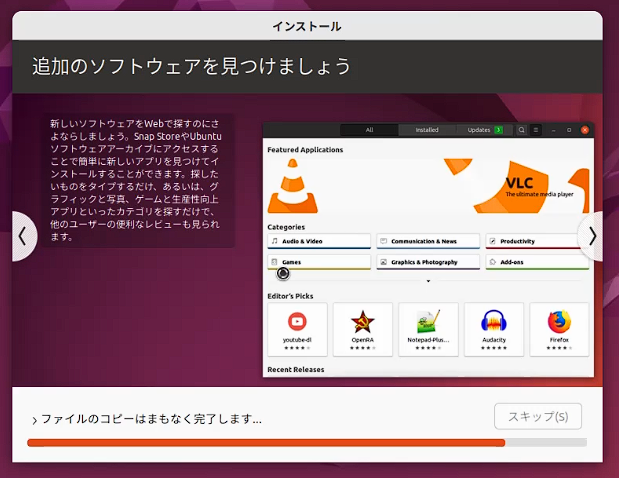
 このあとは長い時間「インストール」画面が出て待たされます。必要なことをパソコンがしているのです。待ちましょう。
After this, the “Install" screen will appear for a long time and you will have to wait. The computer does what it needs to do.So let’s wait.
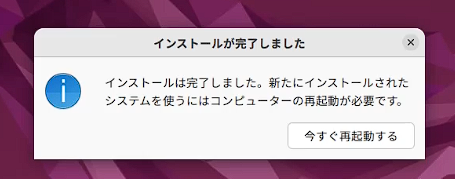
 パソコンがインストール作業を終わらせると、「インストールが完了しました」のウインドウが開きます。「今すぐ再起動する」を押してください。
When the computer has finished installing, the “Installation Complete" window will open. Press “Restart now".
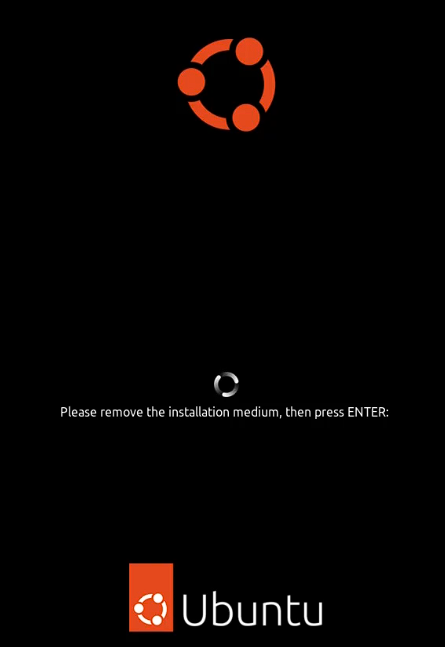
 気を付けてください。黒い画面で、「Please remove the installtion madium,then press ENTER.」と出ていったんとまります。これは、「インストールに使ったUSBメモリやDVD-Rを取り出して、エンターキーを押してください」ということですので、従ってそれらを取り除いた後にエンターキーを押しましょう。
Please be careful. On a black screen, “Please remove the installtion madium, then press ENTER." This means “Remove the USB memory or DVD-R used for installation and press the enter key", so remove them and press the enter key.
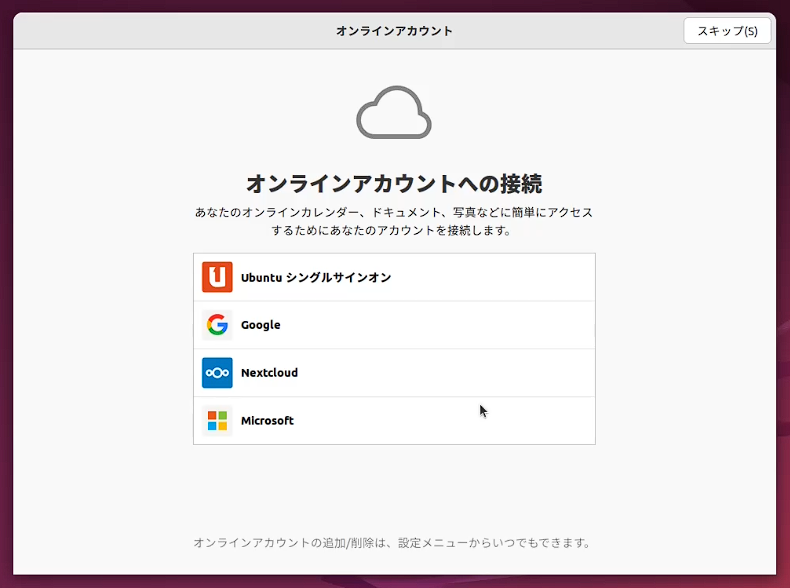
 最初に起動すると自動でログインするためログイン画面は出ません。次は実際に使うさいに「オンラインアカウント」など、いくつかの数のウインドウが出ます。こういった便利機能のもあるので使ってみてくださいと言っているのです。後からも付け加えられますから、ここでは、「スキップ」や「次へ」を押して大丈夫です。最後に「完了」を押して、UBUNTUのインストールは終わりになります。
The login screen does not appear because you are logged in automatically when you start for the first time. Next, when you use it from now on, several windows such as “Online Account" will appear. The computer is saying, “Please try using these convenient functions." You can add it later, so you can just press “Skip" or “Next" here. Finally, click “Finish" to complete the Ubuntu installation.
 4.アップデートのやりかた
4. How to update
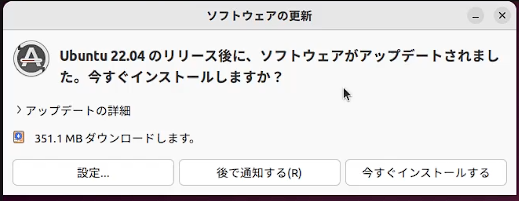
アップデートは基本的に自動的には行われません。(そのため、ある程度の期間ごとに自分で行う必要がありますので、これからお教えします。)最初だけですが、しばらく待っていると「ソフトウェアの更新」ウインドウが出ることがあります。
Updates are generally not automatic. (Therefore, it is necessary to do it by yourself every certain period, so I will teach you from now on.) Although it is only the beginning, if you wait for a while, the “Software Update" window may appear.
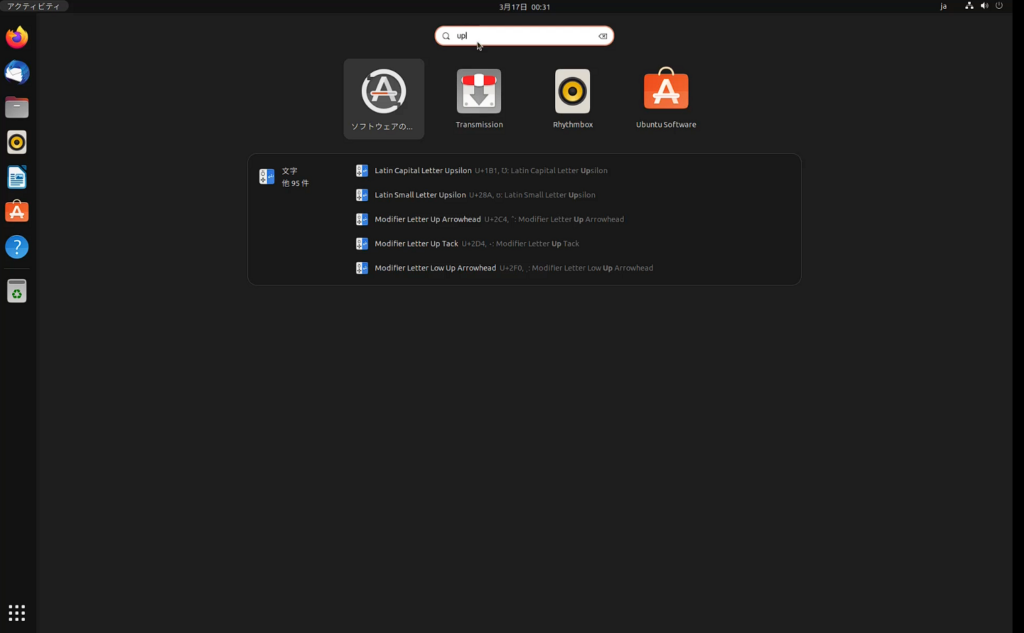
 もし出ない場合(それにたまに行うアップデートのためには)、左上の「アクティビティ」を押して、真ん中に出る虫眼鏡マークのある検索入力枠に「up」などと「Update」の途中までを打ち込んでみてください。すぐ下に、Aの大きな文字のアイコンで「ソフトウェアの更新」が出るはずです。それを押しましょう。
If it doesn’t appear (and for occasional updates), press “Activity" in the upper left and type “up" (and so on, up to the middle of “Update") in the search input box with the magnifying glass in the middle. Try it. Just below you should see “Software Updates" with a big “A" icon. press it.
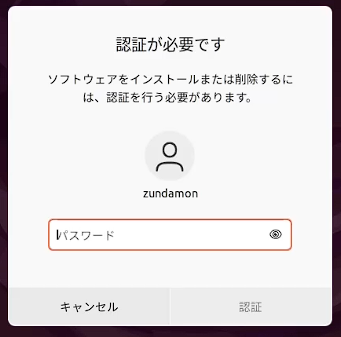
 「ソフトウェアの更新」が出たら、「今すぐインストールする」を押しましょう。必要な場合には、下のように「認証が必要です」ウインドウが出て、パスワードを求められます。インストール時に入れたパスワードを入れましょう。
When “Software Update" appears, press “Install Now". If required, the “Authentication Required" window will pop up asking for a password as shown below. Enter the password you entered during installation.
 パソコンはアップデートのダウンロードをしてから、それを適用していきます。最後に(必要な場合には)以下様に「インストールを完了するには、コンピューターを再起動する必要があります。」と出ますので、すぐに再起動を押して、再起動してアップデートを適用させましょう。
Your computer will download updates and then apply them. Finally (if necessary) you will be prompted with the following message: “You must restart your computer to complete the installation".
Click “Restart Now" to reboot and apply the update.
 「ソフトウェアの更新」でのアップデートは、完ぺきではありません。しかし、通常使う上ではこの方法だけでも問題は無いと私は考えています。ただ、完ぺきな方法もお示ししておきます。
Updating with “Software Update" is not perfect. However, in normal use, I think that there is no problem with this method alone. But I’ll show you how to do it perfectly.
※補:完璧なアップデートの仕方
* Supplement: How to perform a perfect update
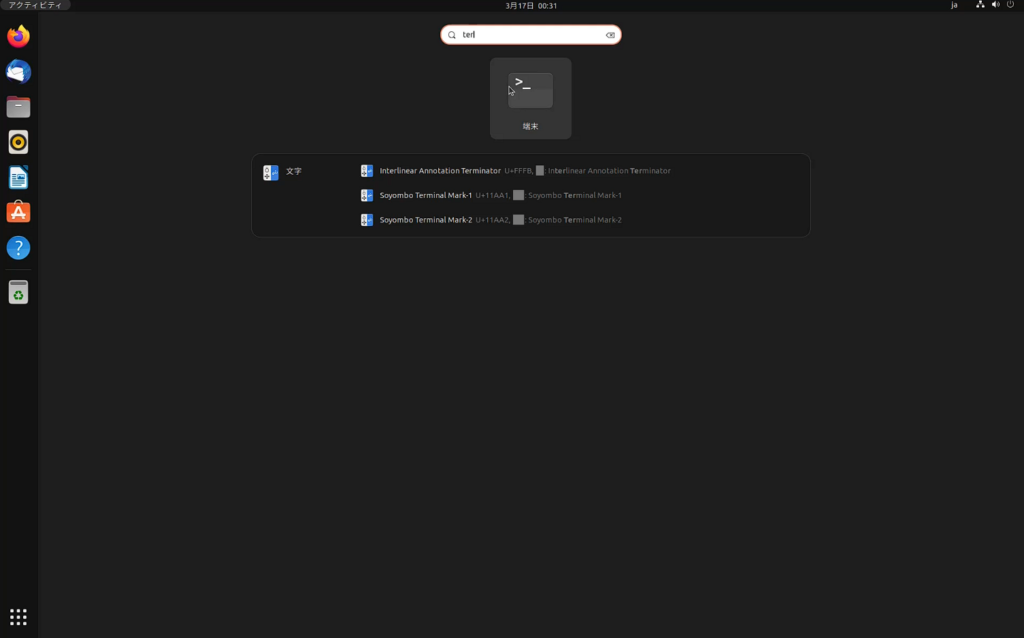
左上の「アクティビティ」を押して、検索枠に「term」(「Terminal」つまり「端末」の初めから何文字か)を打ち込みます。そうすると検索枠の下に大きなアイコンで「端末」が出てきますので、これを押します。
Press “Activities" in the upper left and type “term" (a few letters from the beginning of “Terminal") in the search box. Then, “Terminal" will appear with a large icon under the search box, so press this.
 そうすると、「端末」ウインドウが出てきます。これは、つまりはここにコマンドを打ち込んで、実行させる窓口です。
This will bring up a Terminal window. This is, in other words, a window where you type in commands and have them executed.
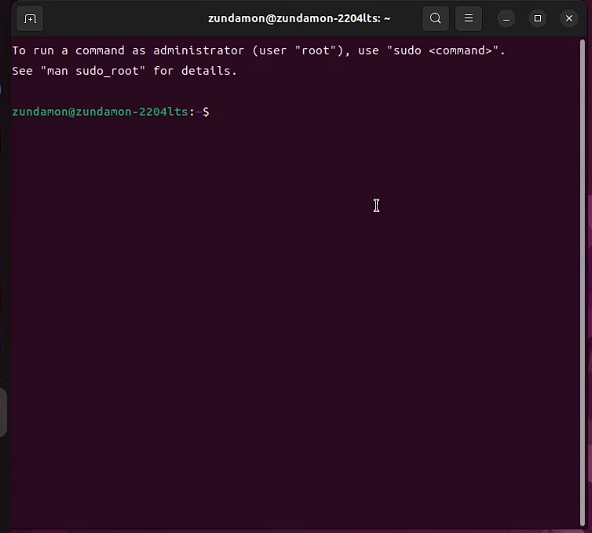 まず、$以降に次のように打ち込みます。(記載の上では初めに$を付けるのが慣例ですが、これは打ち込まないでください。$以降の文字列を打ち込みます)
First, type the following after the $. (In the description, it is customary to “add $ at the beginning", but please do not type this. You type the strings following after letter “$")
$ sudo apt update エンターを押してこのコマンドを実行した場合、以下のように出る例を示していきます。(途中で<あなたの名前>のパスワードと出るので、パスワードを打ち込んでエンターキーを押してください)
Here’s an example of what happens when you hit enter to run this command:
(“Password for <your name>" will appear on the way, so type in the password and press the enter key.)
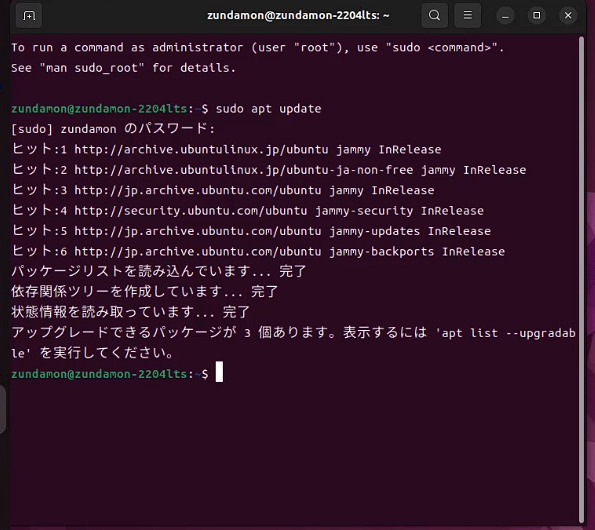 「アップグレードできるパッケージが3個あります」と表示されています。つまり、アップデートできるものが3つあることを示しています。その場合、まず以下のように打ち込んで、アップグレードを試みます。
It says “There are 3 packages that can be upgraded". In other words, it shows that there are three things that can be updated. In that case, first try to upgrade by typing:
$ sudo apt upgrade このようにコマンドを実行した場合に以下のように表示されたとします。
Suppose that the following is displayed when the command is executed in this way.
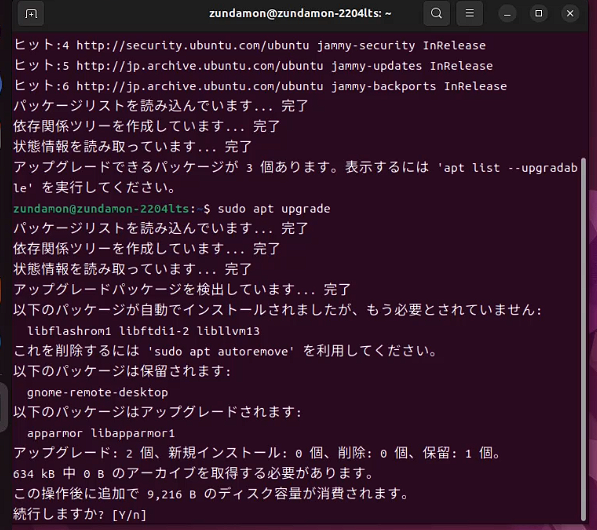 「必要とされていない・消してもいいパッケージ」が3つあって、「sudo apt autoremove」を使って消せることが1つ目に示されています。2つ目は、「保留されるパッケージ」が1つあることを示しています。3つ目は、このコマンドでアップグレードされるパッケージが2つあることを示しています。そこで、パソコンは「2つのパッケージのアップグレードを続けるか」をあなたに尋ねています。
The first shows that there are “three packages that are not needed and can be removed" and can be removed using the “sudo apt autoremove" command. The second indicates that there is 1 pending package. The third shows that there are two packages to be upgraded with this command. So the computer asks you “Would you like to continue upgrading the two packages?"
この場合、「Y」とエンターキーを押してアップグレードを続けてください。
In this case, press “Y" and Enter to continue the upgrade.
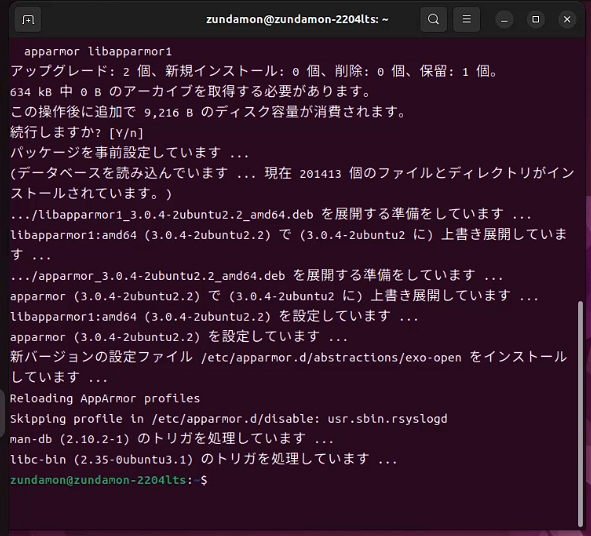 2つのパッケージがアップグレードされました。我々がアップグレードしたい残りは、1つの保留されたパッケージです。
Two packages have been upgraded. The rest we want to upgrade is one pending package.
ここで、保留されたパッケージの名前を知るため、以下のように打ち込みます。
Now, to get the name of the shelved package, type:
$ sudo apt upgrade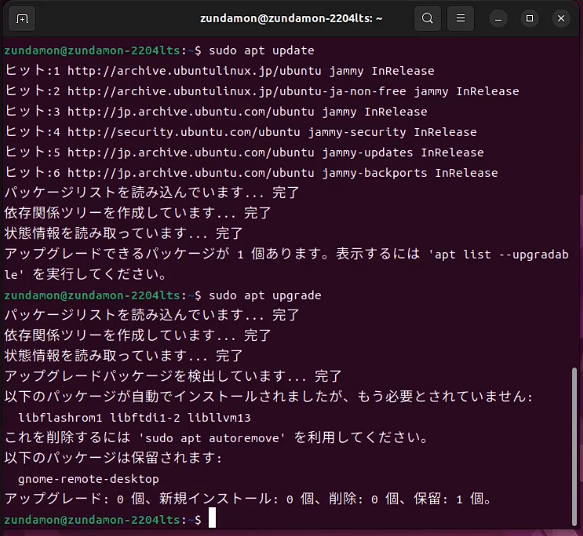 さっきのコマンド実行後に、このように表示されました。ここでは、「gnome-remote-desktop」が保留されていることを示しています。そのため、以下のように打ち込んで(gnome-remote-desktop部分はコピーペーストして)インストールしてしまいます。
After running the above command, the terminal displayed like that:
Here it shows that “gnome-remote-desktop" is pending. Therefore, type the following (copy and paste the “gnome-remote-desktop" part) and install it.
$ sudo apt install gnome-remote-desktopこのコマンドを実行すると以下のようになります。
Running this command looks like this:
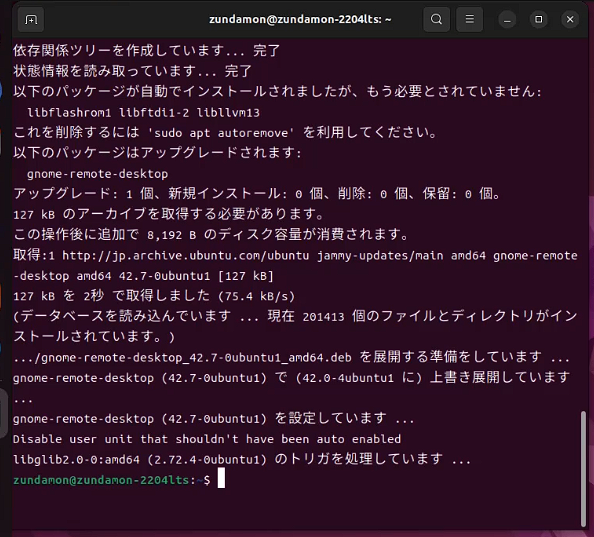
指定した「gnome-remote-desktop」がインストールされました。加えて、必要とされていない3つのパッケージがあり、「sudo apt autoremove」で削除できることが示されています。
The specified “gnome-remote-desktop" was installed. In addition, there are 3 packages that are not required and are shown to be removed with 'sudo apt autoremove’.
最後の残りの作業は、必要とされていない3つのパッケージを「sudo apt autoremove」で削除することです。コピーペーストでいいので、以下のように端末に打ち込みます。
The last remaining task is to remove the three unneeded packages with 'sudo apt autoremove’. You can copy and paste, so type the following into the terminal.
$ sudo apt autoremove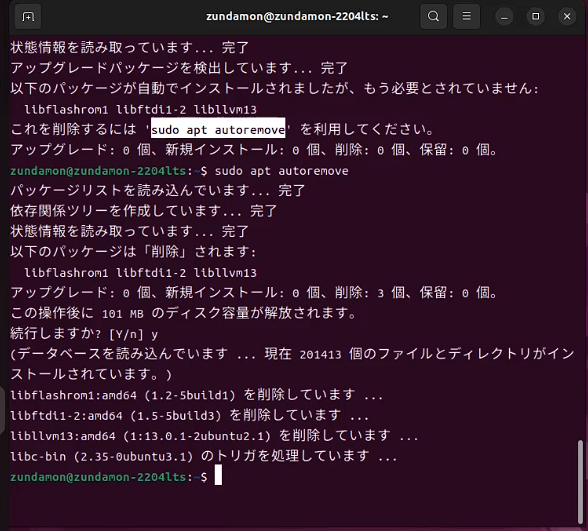
削除を続行するするために、一度「y」を入れて続行してください。これできちんといらないパッケージは消えてくれました。
Enter “y" once to continue the deletion. Now all unnecessary packages are gone.
以上がインストールの方法の説明と、いつものメンテナンスのための、アップデートの仕方になります。
The above is the explanation of the installation ,and the update method for the usual maintenance.
初心者さんでもわかるように、ずんだもんがまったり説明した動画がこちらです。
Here is a video that explains Zundamon in a relaxed manner so that even beginners can understand.
インストール、アップデートの説明はもちろん入っています。さらに、「Ubuntu Software」というアプリストアのようなもので、実際に必要なソフトの探し方や、アプリの実行の仕方(2種類あります)の説明が入っていますので、ぜひ見てみてください。
Installation and update instructions are of course included. It also includes instructions on how to find the software you actually need using something like an app store called Ubuntu Software. It also contains instructions on how to run the app (there are two types). Please check this video.
この動画は英語の字幕付きです。This video has English subtitles.


ディスカッション
コメント一覧
まだ、コメントがありません