週末にCloverの再設定をしました。その2報です。
I reconfigured Clover over the weekend. The second report.
試行錯誤と設定の結果、結構「完成度が高く」なりました。
As a result of trial and error and setting, it became quite “highly complete”.
動くこと一覧
List of things to move
macOS BigSur 11.2.3

シャットダウンおよびSleepとsleepからの復帰
Shutdown and return from Sleep and sleep

iGPUのグラフィックス加速
iGPU graphics acceleration

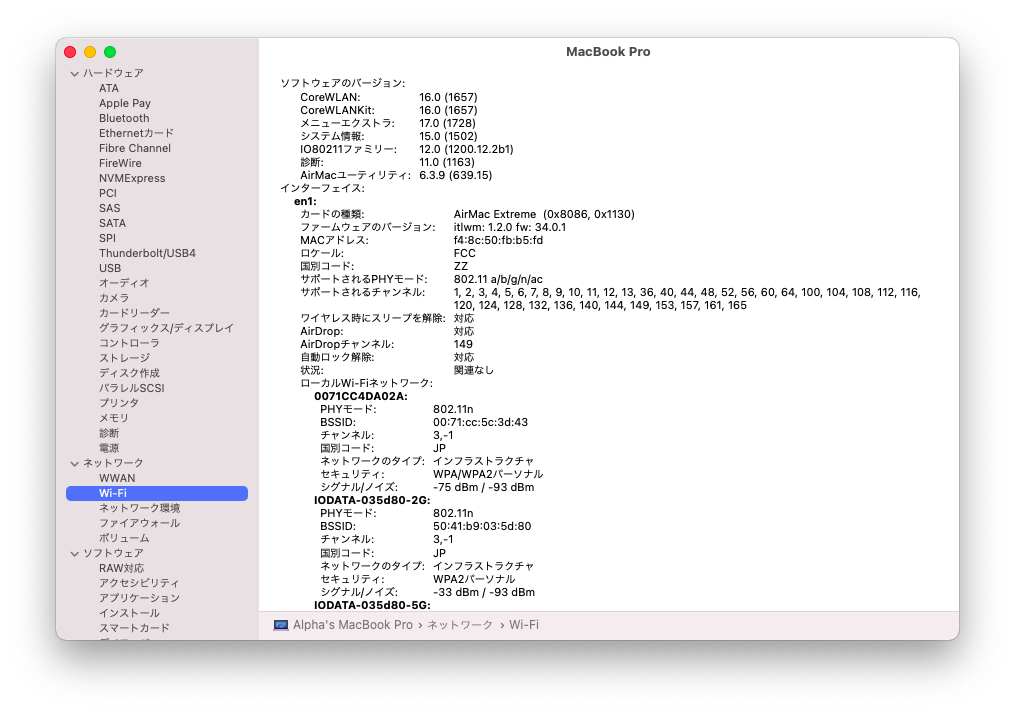
WiFi(2.4,5GHz)

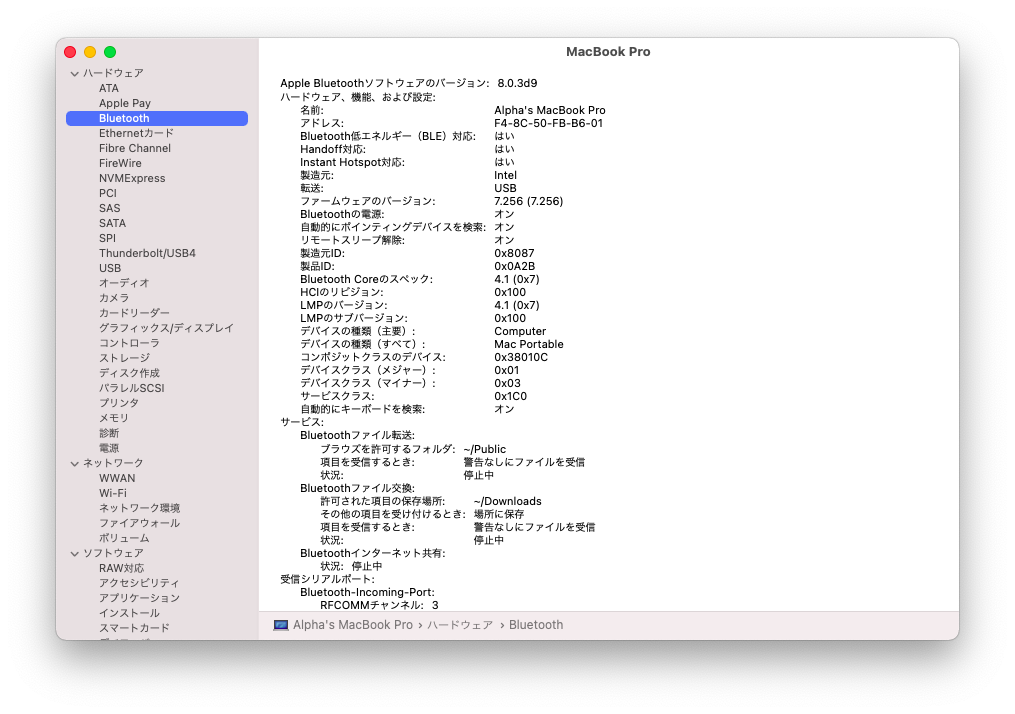
Bluetooth

USB 3.0 x 3 (Gen 1, 5Gbps)

サウンド(内蔵スピーカ・ヘッドフォン自動切り替え)
Sound (automatic switching between built-in speaker and headphones)

内蔵カメラ・マイクロフォン
Built-in camera / microphone

Fnキーからの明るさ・音量調整
Brightness / volume adjustment from Fn key

Siriの音声認識
Siri speech recognition

バッテリー残量表示
Battery level display

Night Shift

マルチタッチジェスチャ(2本指でスクロールできる程度)
Multi-touch gesture (to the extent that you can scroll with two fingers)

App Store
設定の概略:
Outline of setting:
Desktop SkylakeのClover設定+Sleep強化設定をする。OpenCoreでの Laptop SkylakeのQuirkと一部のSSDTを使う。DSDTにLenovo T460のパッチの一部をかける。
Set Clover setting + Sleep enhancement setting of Desktop Skylake. Use Laptop Skylake Quirk and some SSDTs on OpenCore. Apply some Lenovo T460 patches to DSDT.
後で、サンプルEFIを紹介します。しかし、System(BIOS)の更新があるとACPIが変わるので、そのまま使えない場合があります。このため、ACPIパッチの作成方法を載せておきます。
Later, I will introduce a sample EFI. However, if the System (BIOS) is updated, the ACPI will change, so it may not be possible to use it as it is. For this reason, I will show you how to create an ACPI patch.
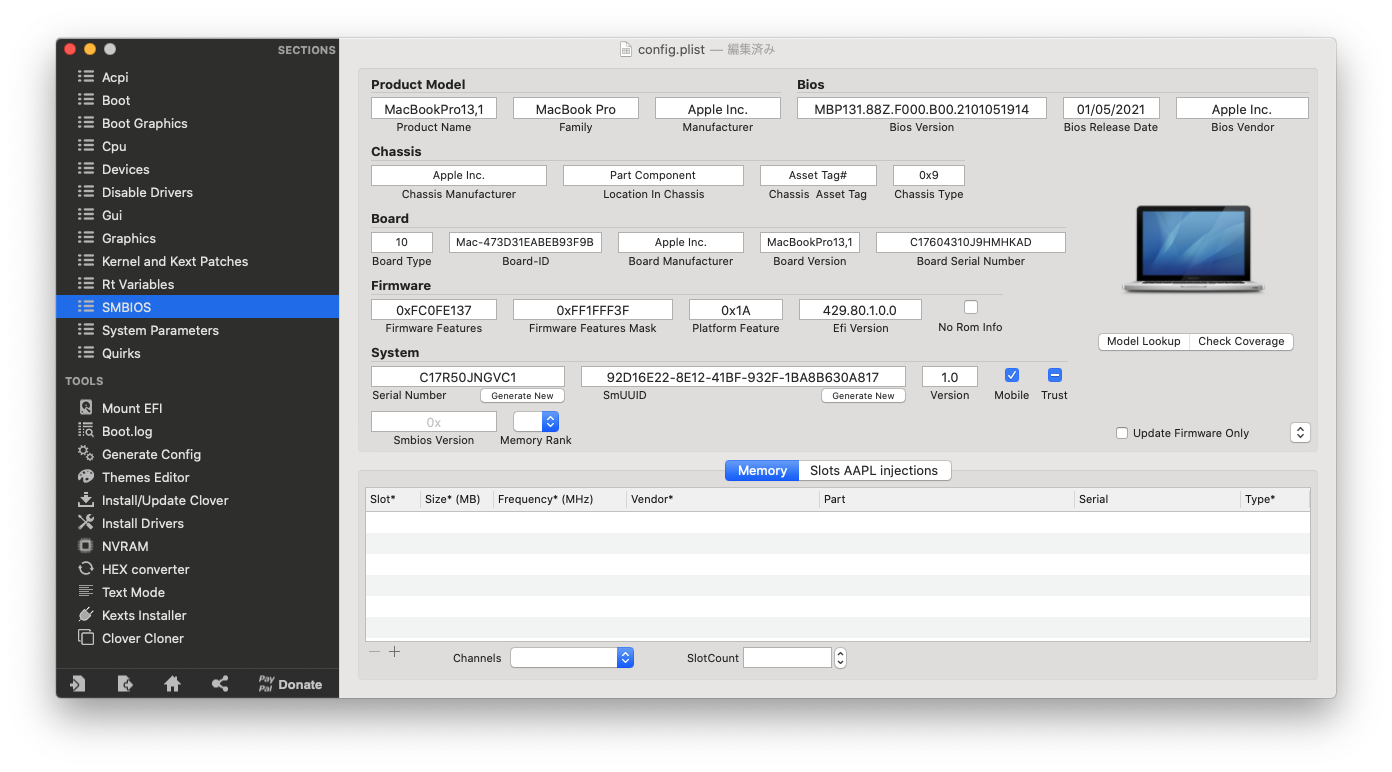
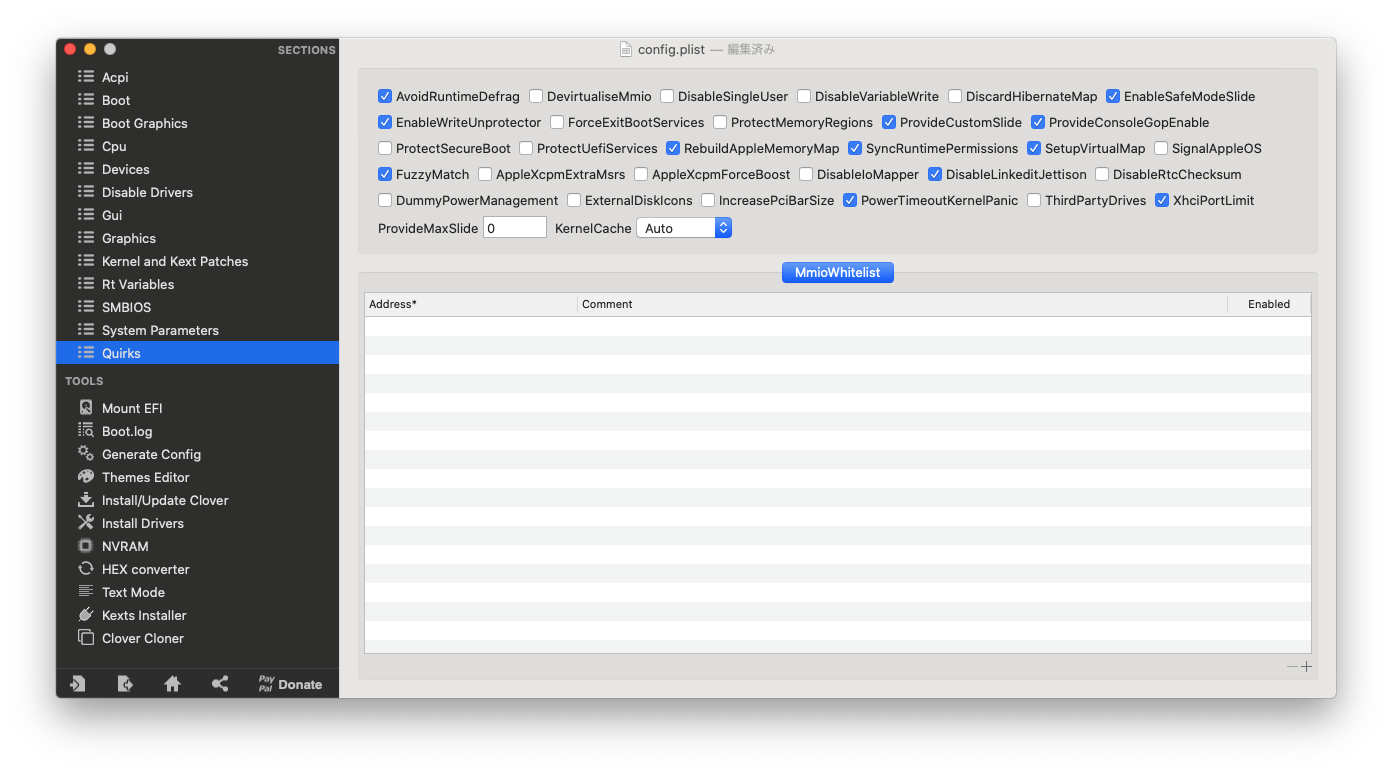
まず、Clover Configrator画面は以下のとおりです。(今のPlistEDPlusで編集するとファイルが崩れるようです。常駐するCloverの編集機能で行ったところうまくいきました。)
First, the Clover Configrator screen is as follows. (It seems that the file is corrupted when edited with the current PlistED Plus. When I did it with the editing function of the resident Clover, it worked.)
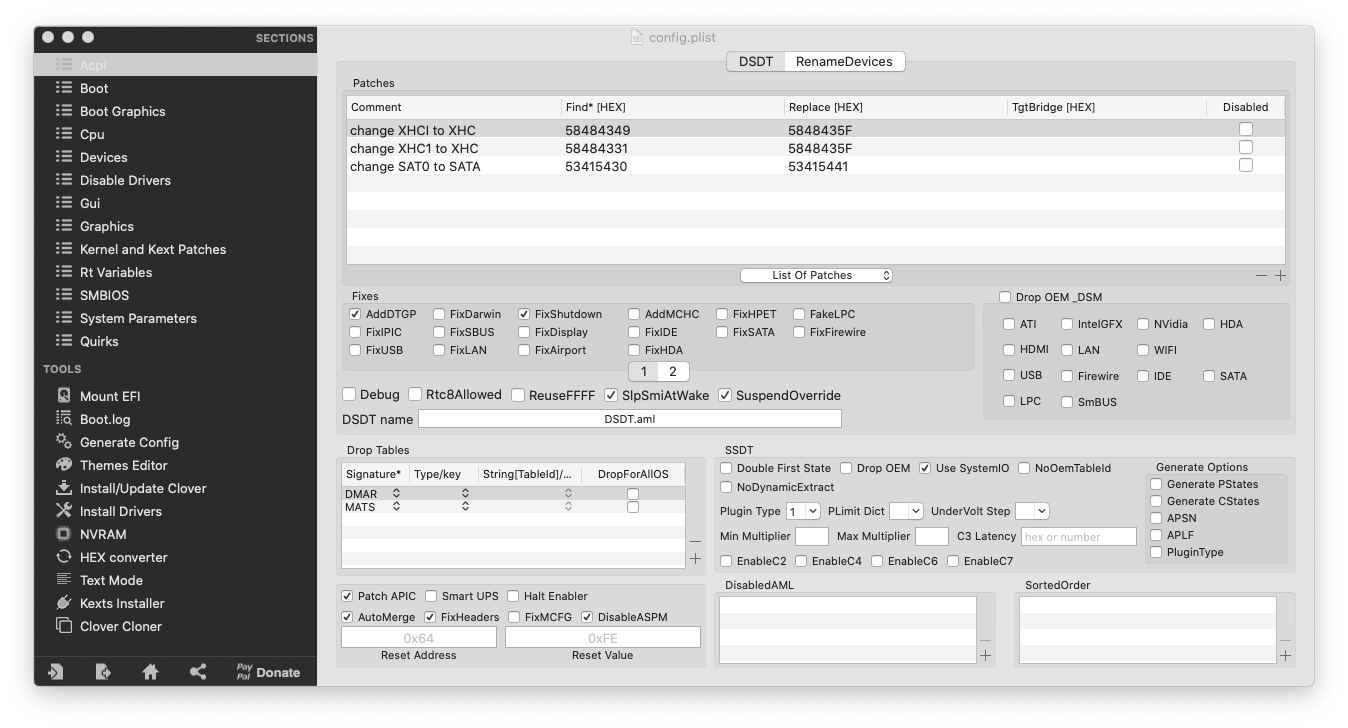
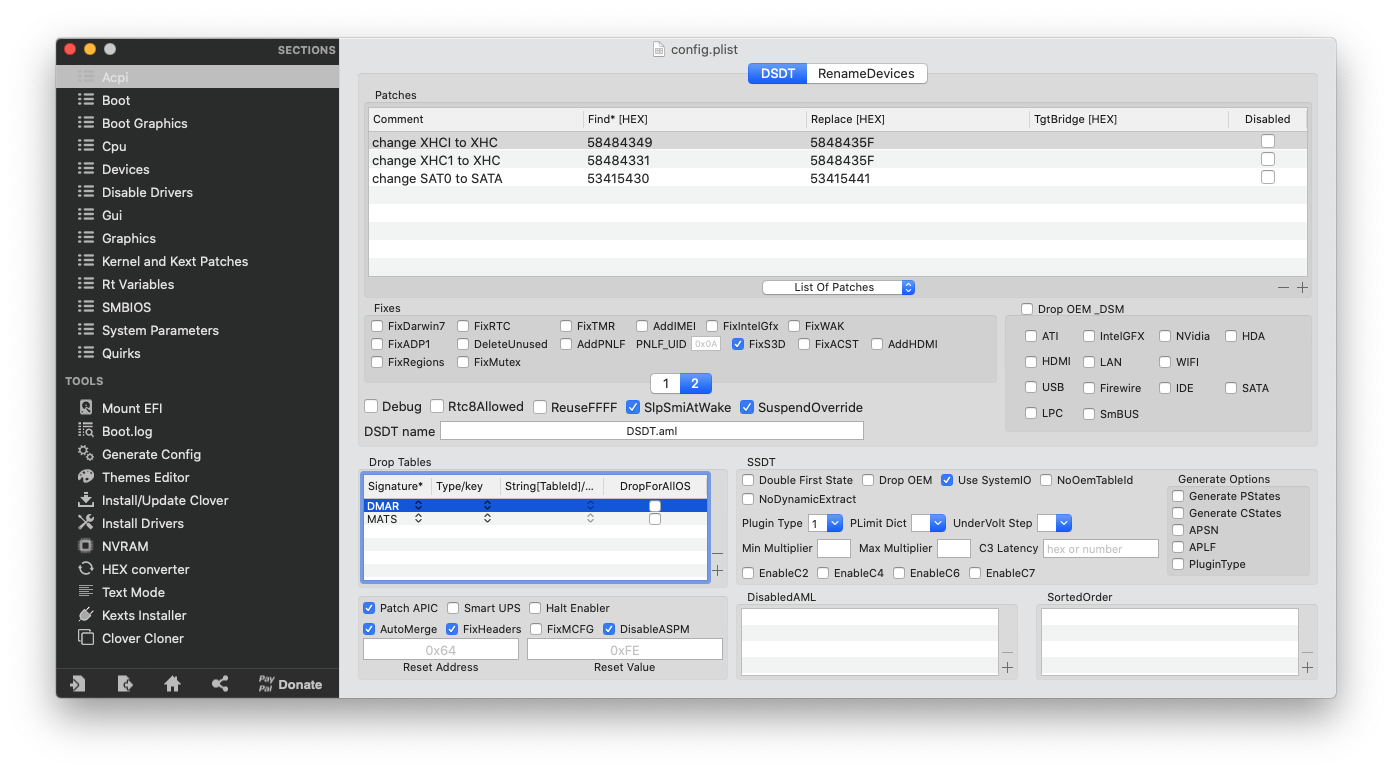
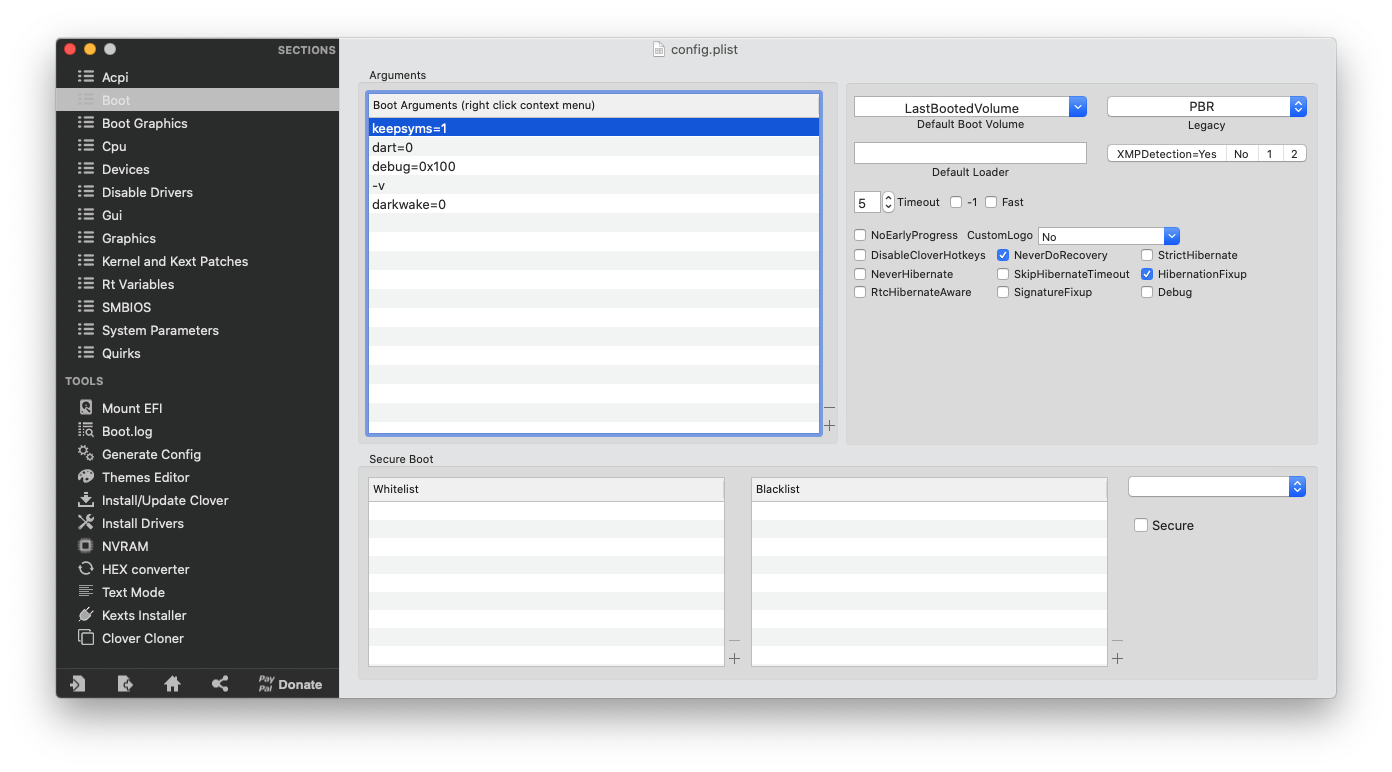
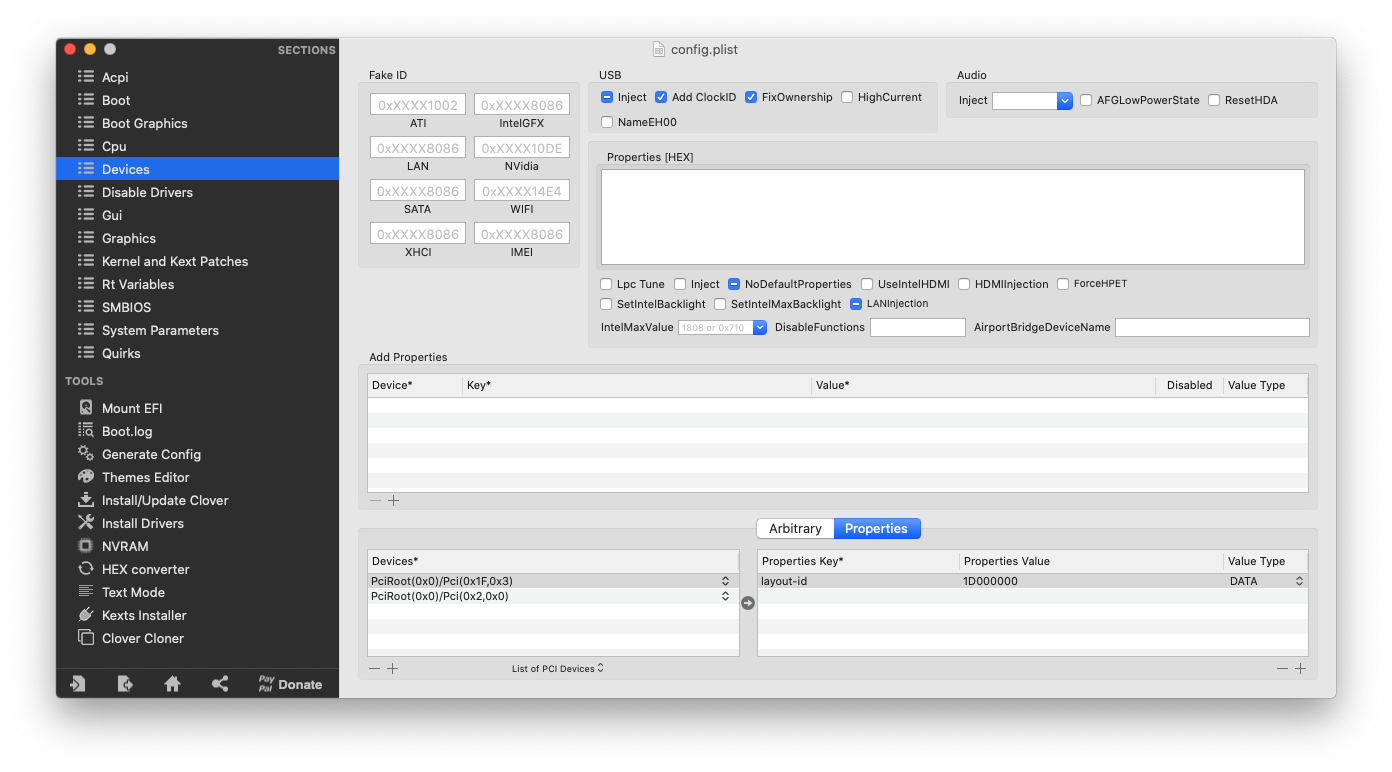
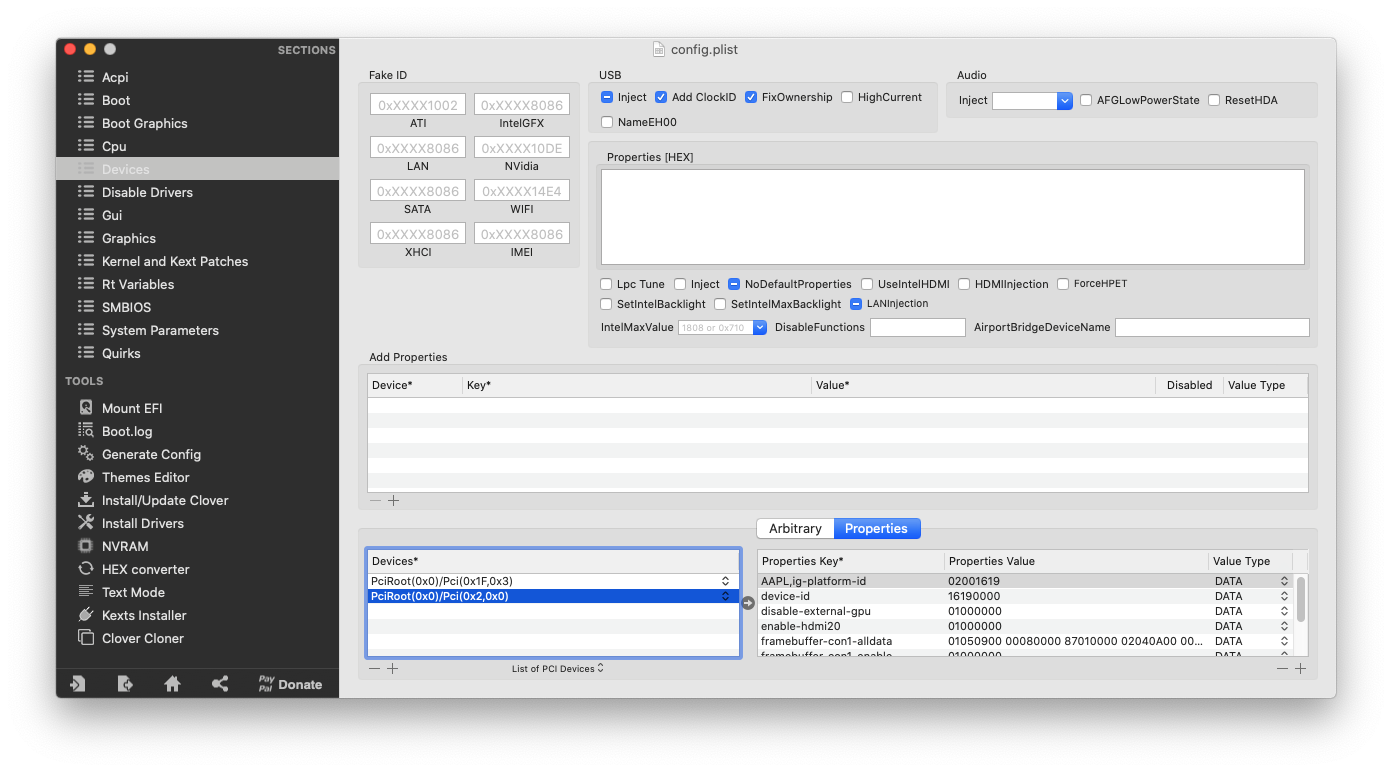
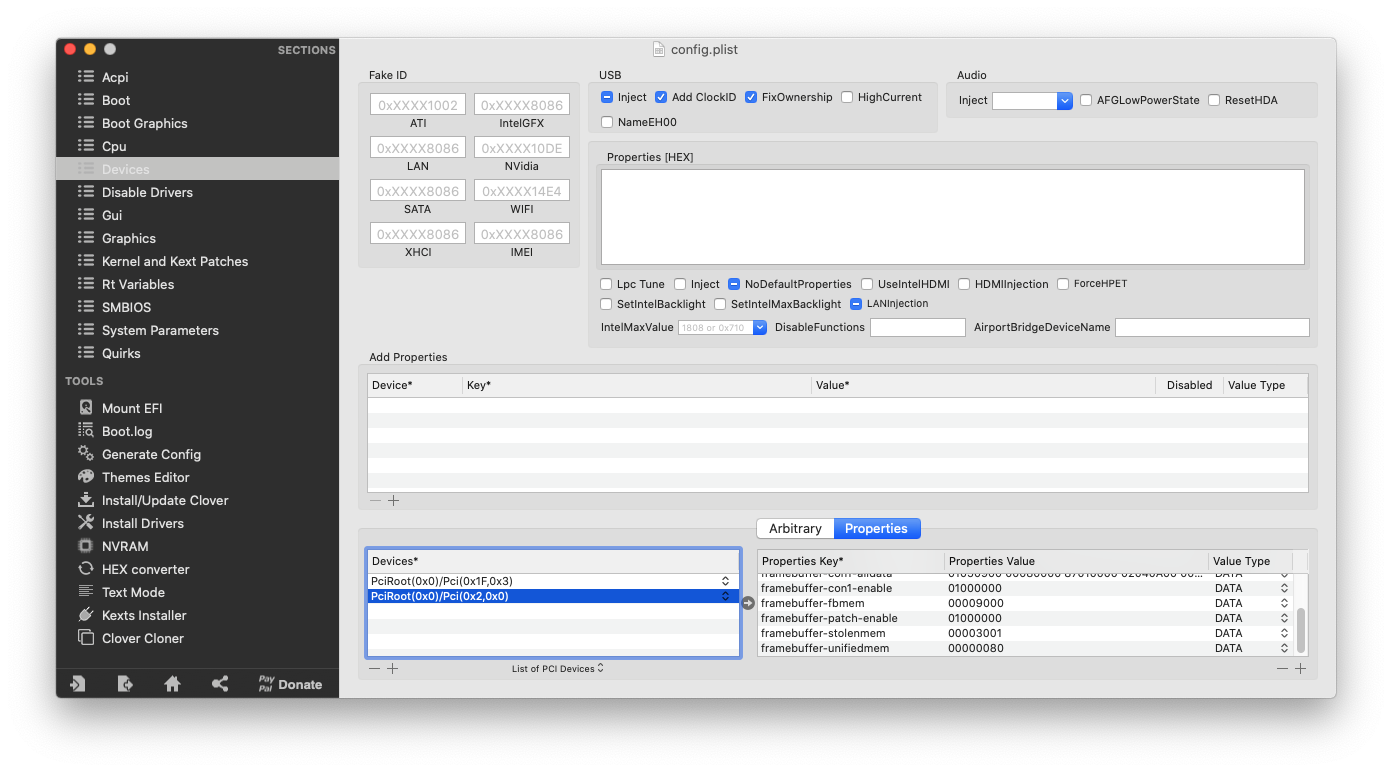
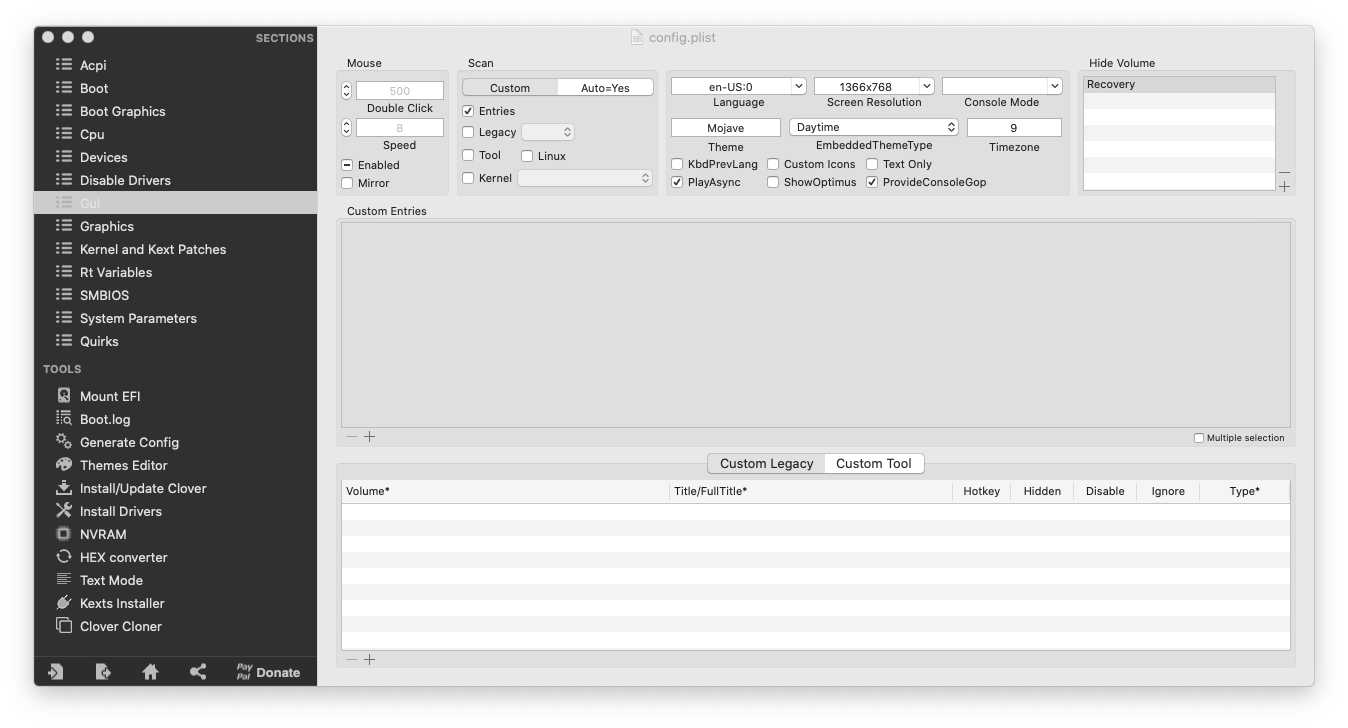
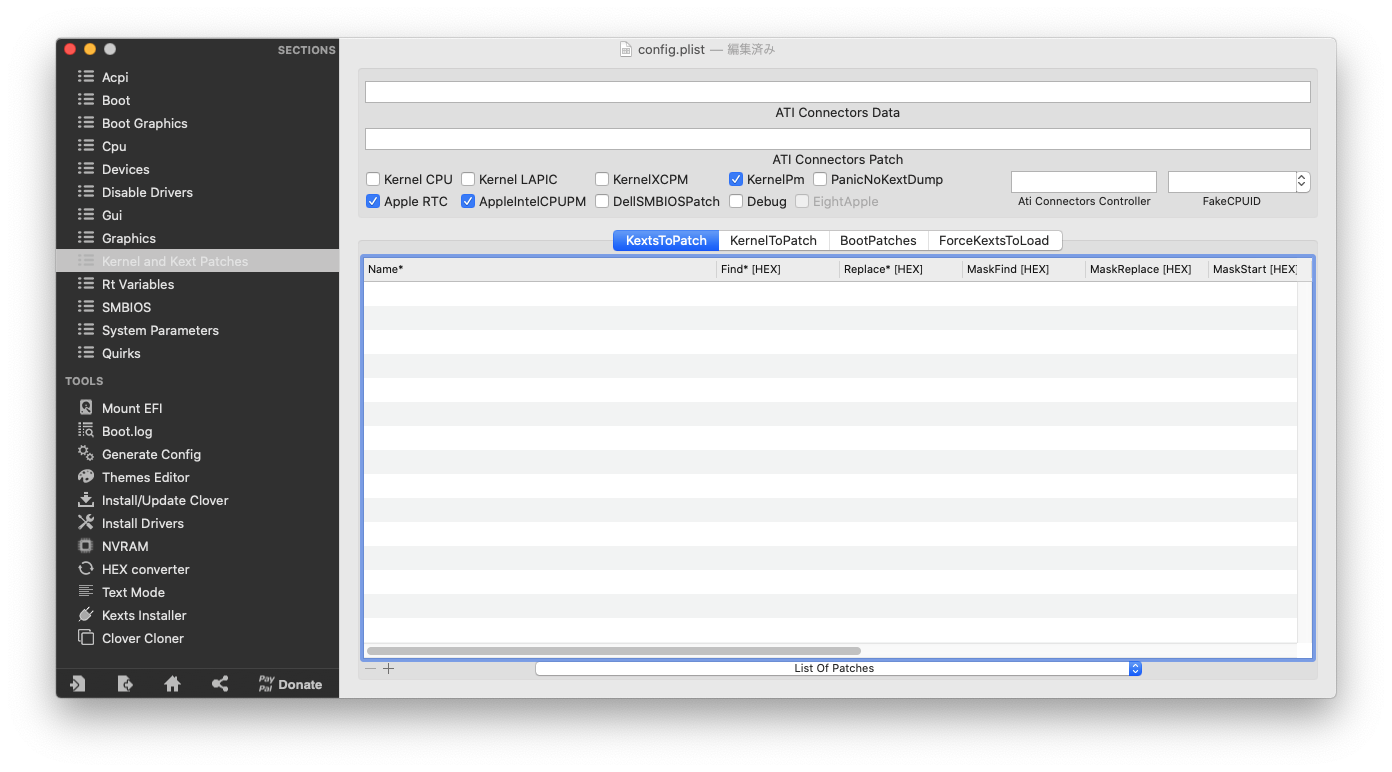
vesapro-VK23LBZDT-config.plist
1.ACPI ファイルの抽出
1. Extract the ACPI file
前に投稿した取りあえず動くClover(versapro-i3-6100u.zip)を使って、DSDT,SSDTを抽出します。メニューエントリ画面でF4を押します。
Extract the DSDT and SSDT using the previously posted easy-to-launch clover (versapro-i3-6100u.zip). Press F4 on the menu input screen.
Cloverによって、EFI/Clover/ACPI/origin/の中にamlファイルが取得されます。これらをデスクトップのoriginalフォルダに入れます。DSDT.amlとSSDT*.amlだけをコピーします。
Clover gets the aml file in ”EFI/Clover/ACPI/origin/”. Put these in the ”original” folder on your desktop. Copy only ”DSDT.aml and SSDT * .aml”.
2.ディスアセンブリング
2. Disassembling
これらのACPIファイルにパッチをかけます。いきなりMaciASL.appを使いたくなりますが、なぜか、それではうまくいきません。
Patch these ACPI files. I’d like to use MaciASL.app if possible, but for some reason that doesn’t work.
https://bitbucket.org/RehabMan/acpica/downloads/
へ行って、
iasl.zipを落とし、iaslを解凍しましょう。
https://bitbucket.org/RehabMan/acpica/downloads/
Go to the web above and Download iasl.zip and unzip iasl.
この、iaslをできればパスの通ったところに置きたいのですが、いかんせんBigSurだとバイナリは多くの場合System域でアクセス不可能なので、ひとまずこれを自分のホームフォルダに置きます。
I’d like to put this iasl somewhere in the path if possible, but in the case of Big Sur, binaries are often inaccessible in the System area, so I put this in my home folder for the time being.
% cp ~/Downloads/iasl ~ ディスアセンブルは以下のように行います。
Disassemble as follows.
% cd ~/Desktop/original
% ~/iasl -dl DSDT.aml SSDT*.aml
これで、各dslファイルが生成できましたので、dslファイルをデスクトップのorgdslフォルダへ入れましょう。
Now that I have generated each dsl file, let’s put the dsl file into the ”orgdsl” folder on my desktop.
3.コンパイルの用意
3. Preparation for compilation
デスクトップにある、orgdslフォルダからpatchedフォルダへDSDT.dslをコピーしましょう。
Copy DSDT.dsl from the ”orgdsl” folder on your desktop to the ”patched” folder there.
acidanthera /MaciASL (https://github.com/acidanthera/MaciASL)
上のWebから、MaciASLの最新リリースを落としましょう。アプリケーションフォルダへ放り込んで、一度右クリックの開くで開けば、準備はOKです。
acidanthera / MaciASL (https://github.com/acidanthera/MaciASL)
Let’s drop the latest release of MaciASL from the above web. Just throw it in the application folder, right-click to open it, and you’re ready to go.
4.パッチテキストファイルの用意
4. Preparation of patch text file
今回のパッチはLenovo X260相当なので、Lenovo T460のパッチを使います。(ややこしいですが・・・)
This patch is equivalent to the Lenovo X260, so use the Lenovo T460 patch. (It’s complicated …)
今のT460のパッチファイルはGit-Hubにあります(改良等もあるようです)。ソースとなるWebページは以下のとおりです。
The current patch file for T460 is on Git-Hub (it seems that there are improvements etc.). The source web pages are:
tluck/Lenovo-T460-Clover(https://github.com/tluck/Lenovo-T460-Clover)
このWebページの”DSDT.T460”の”patch-files”に目的のパッチファイルがあります。(Zipでダウンロードしましょう)
The target patch file can be found in “patch-files” of “DSDT.T460” on this web page. (Let’s download with Zip)
なくなると困るので、現在のところを保存してありますので、以下からどうぞ
I’m in trouble if it disappears in the future, so I saved the current one, so please click below
Lenovo-T460-Clover-master.zip
5.パッチとアセンブル
5. Patches and assemble
デスクトップのpatchedフォルダのDSDT.dslをダブルクリックします。Masiaslが動きます。patchボタンを押し、Openボタンを押しパッチファイル(txt形式)を開きます。
Double-click “DSDT.dsl” in the “patched” folder on your desktop. “Masiasl” works. Press the “patch button” and then the “Open button” to open the patch file (txt format).
ここで、使うパッチファイルは、先程示したZipタイルのいかにあります。
Here, the patch file to be used is located in the folder shown below in the Lenovo-T460-Clover-master.zip shown earlier.
Lenovo-T460-Clover-master/DSDT.T460/patch-files/使うのは次の3つのパッチファイルです。
Apply the following three patch files
1_led_blink.txt   (Blinking LED during sleep and lighting during wakeup )
2_IGBE_PRW.txt  (Wake up from sleep with power button )
4_battery_fan.txt  (Patches for batteries, fans, etc. )
これらのファイルを、”Open”,”Apply”していきます。
Let’s “open” and “apply” these files.
最後に、”Close”します。これで、パッチは当たっています。一度Compileを押し、エラーがないことを確認んしてください。(ワーニングはたくさん出ます。これは正常です。)
Finally, “Close”. The patch is now on. Press Compile once and make sure there are no errors. (There are a lot of warnings. This is normal.)
最後に、”File>Save as”で”DSDT.aml”と名前を直し、下の選択で”ACPI Machine Language Binary”を選びセーブします。
Finally, rename it to “DSDT.aml” with “File> Save as” and select “ACPI Machine Language Binary” from the selection below to save.
6.”EFI/Clover/ACPI/patch”に置くべきファイルは以下のとおり
6. The files that should be placed in ”EFI/Clover/ACPI/patch” are as follows
 DSDT.aml (Now,the patched one )
 SSDT-0-TcgTable.aml (The files in the "original" folder on your desktop remain the same. Same for the following)
 SSDT-1-SaSsdt.aml
 SSDT-2-PerfTune.aml
 SSDT-3-SataAhci.aml
 SSDT-4-CpuSsdt.aml
 SSDT-5-CtdpB.aml
 SSDT-PLUG-DRTNIA.aml (From the explanation of OpenCore = from Dortania )
 SSDT-PNLF.aml     (From the explanation of OpenCore = from Dortania )
 SSDT-x4_0-Cpu0Ist.aml (The files in the "original" folder on your desktop remain the same. Same for the following)
 SSDT-x4_1-ApIst.aml
 SSDT-x4_2-Cpu0Cst.aml
 SSDT-x4_3-ApCst.aml
 SSDT-x4_4-Cpu0Hwp.aml
 SSDT-x4_5-ApHwp.aml
 SSDT-x4_6-HwpLvt.aml
Note: Items may change due to system updates. Insert the patched DSDT.aml and SSDT * .aml.
7.Kext(私は”11″というフォルダに入れています。)
7.Kexts (I put these in a folder called “11”)
 ACPIBatteryManager.kext
 AirportItlwm.kext
 AppleALC.kext
 BrightnessKeys.kext
 HibernationFixup.kext
 IntelBluetoothFirmware.kext
 IntelBluetoothInjector.kext
 IntelMausiEthernet.kext
 Lilu.kext
 SMCBatteryManager.kext
 SMCLightSensor.kext
 SMCProcessor.kext
 SMCSuperIO.kext
 USBInjectAll.kext
 VirtualSMC.kext
 VoodooPS2Controller.kext
 WhateverGreen.kext
8.サンプルEFI
8. Sample EFI
今回作ったサンプルEFIは以下のとおりです。
The sample EFI made this time is as follows.
Vesapro-VK23LBZDT-Sample2104110818-EFI.zip
途中で述べたように、BIOS等システム自体のアップデートでACPIは変わります。
今回は次報で述べるように、Windows10との1SSDデュアルブートとしました。
その時に、Windowsがシステムアップグレードを行ったため、ACPI情報が直されたためブートできなくなりました。そこで、ACPIを再作成して直りました。
ここでのサンプルEFIもシステムアップデートの状況により動かない場合があります。
その場合は、固有のACPIによらない簡易Cloverローダ(versapro-i3-6100u.zip)から初めて、ACPIにパッチを当ててください。
As mentioned in the middle, ACPI changes with the update of the system itself such as BIOS.
As I will write in the next report, I set this computer to 1SSD dual boot of Windows 10 and Big Sur. At that time, because Windows upgraded the system, the ACPI information was updated and Big Sur could not boot. So I recreated ACPI and fixed it.
The sample EFI here may not work depending on the status of the system update. In that case, please apply the patch to ACPI for the first time from the simple Clover loader (versapro-i3-6100u.zip) that does not depend on the unique ACPI.
Thank you.





コメント