
簡単便利実用的な自宅ファイルサーバの作成説明。Making-explanation of a simple and practical home file server.
子供の写真や動画とか、スマホ持ってるといっぱい撮っちゃいますよね。それに、持ってるノートパソコンのバックアップとか、いざと言う時を考えてとって起きたいです。でもUSBのHDDはどこのどれやらになりそうだし、「NASを買えば?」と言われても、そこだけに写真とかを持っていったら、HDD別に出来ないから更にそのバックアップようのNASがいるんですよね。「RAIDでいいじゃん」って知ったかぶりしてる方、あれってバックアップでないんですよ。ちょっと恥ずかしい間違えですよ。
Everyone and I. We take a lot of photos and videos of our children when we have smartphones. Besides, we want to take a backup of the laptop computer we have and think about when it comes to emergency. But you think it’s troublesome to manage which USB HDD you put it in? Some people say, “Why don’t you just buy a NAS?" But we stored photos and such only on that NAS. However, NAS cannot store data separately for each HDD. Then you need yet another NAS for backup of that NAS. It’s expensive and troublesome. Those who pretend to know that “RAID is fine", that’s not a backup. It’s an embarrassing mistake.
ここで自作パソコンを使うの人のことを考えてみましょう。5から10年くらいでCPUが古くなり実際に使ってた数台のパソコンが入れ替わります。私はお金を節約したいので、ほとんどの場合、マザーボードを入れ替えます。そして、古い方のマザーボードはお下がりのケースに入れます。その繰り返しを何台かすれば、古いのはちょうどWindowsには使いたくないけれど、Linux(UBUNTU)がうごくパソコンが余るのです。これにHDDをたくさんつなげばどうやら、ファイルサーバにできて、目的は達成できそうです。
Now think about a hobbyist who builds their own personal computer. In about 5 to 10 years, the CPU will get old and some computers that were actually used will be replaced. I want to save money so most of the time I only replace the motherboard. Then put the old motherboard in a hand-me-down case. I do a few repetitions of that. Then, although it is old and I do not want to use it for Windows, I want to run Linux (UBUNTU). That has just the specs for Linux, and that PC is surplus. If many HDDs are connected to this, it can be used as a file server, and as a result, the purpose seems to be achieved.
欲しい機能はこういうものです。ファイルサーバで、しかもHDDが1つずつがいっぺんに見渡せるように、HDDがフォルダ単位でまとまってること。そしてしかも、HDD1つ1つをどのくらい使ってるのかわかること。そうすれば、HDDをペアにしてお互いにバックアップしておけば、どちらかが壊れた時に書き戻すことが出来ます。そういうファイルサーバが良いですね。
The functionality we want is something like this. It is a file server, and the HDDs are as folders, so that we can see the each HDD from conectted drive at once. And what’s more, we can see how much we’re using each HDD. That way, if you pair the HDDs and back them up to each other, we can write them back if one of them fails. That kind of file server is we want.
実際に私はそのようなファイルサーバを10年以上使っています。今回はそのサーバの作りかたを説明します。ここからは、用語が理解出来る人向けになっちゃいます。もし全部のチュートリアルが必要な方は、詳しく説明したYoutube動画を後に載せたので見てくださいね。
In fact I’ve been using such fileservers for over ten years. This time I will explain how to make this fileserver. From here on, it will be for those who can understand the terminology. If you want the full tutorial, I’ve posted a detailed YouTube video below.
0.下準備
0. preparation
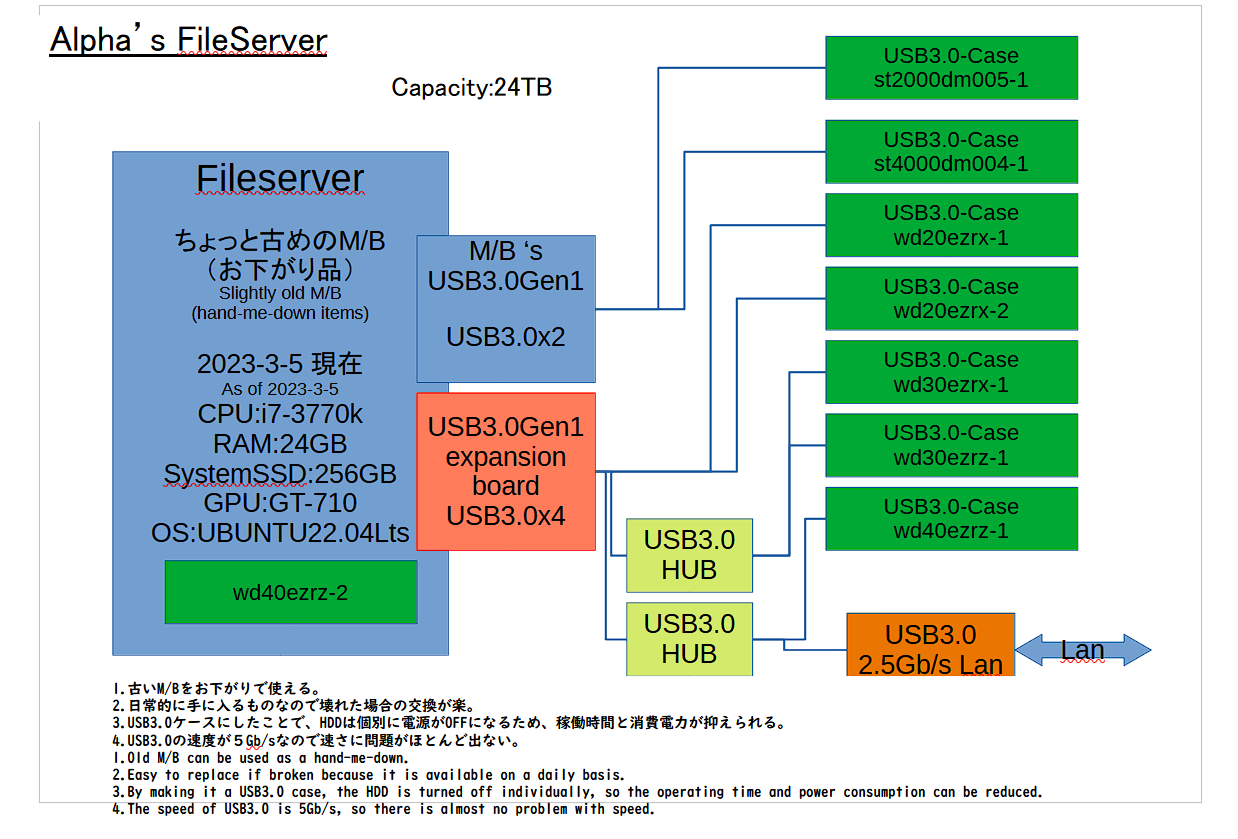
ファイルサーバとして使う場合、まずUBUNTU22.04LTSが動く必要があります。また、扱う情報の速度が必要なため少なくともcore iからのCPUがいいでしょう。私の場合、昔にメインに使っていたパソコンがお下がりでこのファイルサーバになりました。HDDをたくさんつけることと 2.5Gb LANのために少しだけ手を加えたものです。
When using as a file server, UBUNTU22.04LTS must be booted first. Also, since the speed of handling information is necessary, at least a CPU from core i is good maybe. In my case, the computer that I used to use as my main computer was handed down and became this file server. I modified it a little bit for adding lots of HDDs and 2.5Gb LAN.a
CPU:Core i7-3700k
RAM:24GB(8GBx2,4GBx2)
GPU:Nvidia GeForce GT 710
SSD:HP SSD 2.5'' 250GB(System)
ServiceHDD
      WD20EZRX-1 2TB
      WD20EZRX-2 2TB
      WD30EZRZ-1 3TB
      WD30EZRX-1 3TB
      WD40EZRZ-1 4TB
      WD40EZRZ-2 4TB
      ST4000DM004-1 4TB
      ST2000DM005-1 2TB
              total 24TB
USB3.0Card:USB 3.0 Host Controller:Renesas uPD720201
2.5Gb/s LAN:RSHTECH USB3.0 to Ethernet Adapter WF-A25
また、以前の記事通りサーバ化してあってリモートデスクトップで見れるようにしておく必要があります。以下にリンクを張っておきます。
Also, as in the previous article, it must be serverized so that it can be viewed with remote desktop. I will write the link below.
〇中古ノートパソコンを使ってUBUNTUでお気楽簡単自宅サーバを作ろう。リモートデスクトップ設定編、Let’s make a comfortable and easy home server with UBUNTU using a used laptop. Remote desktop setting
1.つなげたサーバ用のHDDをext4でフォーマットする
1. Format the HDD for the connected server with ext4
サーバ用につなげたHDD(ここではその名前をhddname-1,hddname-2,hddname-3…仮定としてます)をgpartedでGPT,ext4でフォーマットします。買ってきてつなげた場合ほとんどの場合Windows用にNTFSでフォーマットされてあるのでext4にフォーマットしなおしましょう。(ファイルの分断化が起こりにくいのでフォーマット形式はext4がよいです。)
Format the HDD connected for the server (here the names are hddname-1, hddname-2, hddname-3…) with gparted with GPT, ext4. If you buy and connect it, in most cases it is formatted with NTFS for Windows, so let’s format it again with ext4. (ext4 is a good format, as it is less likely that the file will be fragmented.)
2.マウントポイントを作ってマウント用に/etc/fstabを編集する
2. Create a mount point and edit /etc/fstab for mounting
マウントポイントを作ります。(フォルダを作ればいいです)ここでは、ルートにfileserverを作り、その下にHDDの名前のフォルダを3つ作りました。もちろんフルアクセスにして、ゲストでも入れるようにしておきます。
Create a mount point. (You can create a folder) Here, I created a fileserver in the root and created three folders with the names of the HDDs under it. Of course, make it full access so that even guests can enter.
$ cd /
$ sudo mkdir fileserver
$ sudo chmod 777 fileserver
$ cd fileserver
$ mkdir hddname-1
$ mkdir hddname-2
$ mkdir hddname-3
...
$ chmod 777 *
つぎは、driveアプリやblkidコマンドでサーバ用HDDのUUIDをしらべて、/etc/fstab編集しましょう。
Next, check the UUID of the server HDD with the drive app or blkid command and edit /etc/fstab.
$ sudo gedit /etc/fstab
------
# For Fileserver service(example)
UUID=5d54e21d-c493-406d-8f5a-0f9a80940f41 /fileserver/hddname-1 ext4 errors=remount-ro 0 1
UUID=ce480c10-6161-412c-85a9-90dd5a875cbc /fileserver/hddname-2 ext4 errors=remount-ro 0 1
UUID=3e42c71e-649c-4edd-b204-2833d0d68c1e /fileserver/hddname-3 ext4 errors=remount-ro 0 1
...
------
再起動などして(mount -aでもいいと思います)マウントします。
Mount it by rebooting (or “mount -a" is OK, I think).
3.マウント後のHDDのモードも全員が入れるようにする。
3. After mounting, set the mode so that everyone can enter the HDD.
$ cd /
$ cd fileserver
$ chmod 777 *
$ ls -al
(check mode of mounted HDDs)
4.Sambaのインストールと、そのコンフィグレーションファイル(/etc/samba/smb.conf)の設定
4. Install Samba and edit its configuration file (/etc/samba/smb.conf)
Sambaを以下の様にインストールします。
Install Samba as follows.
$ sudo apt install samba Sambaの設定ファイルを一応バックアップコピーしておき、内容を以下の様に編集します。
Make a backup copy of the Samba configuration file and edit the contents as follows.
$ cd /etc/samba
$ sudo smb.conf smb.bak.conf
$ sudo gedit smb.conf
ワークグループを書き換えておく。
Change workgroup.
------
# Change this to the workgroup/NT-domain name your Samba server will part of
workgroup = ZUNDANET
------
以下になっているかチェックする(ゲストが入れるために)
Check below (for guests to enter)
------
# This option controls how unsuccessful authentication attempts are mapped
# to anonymous connections
map to guest = bad user
------
これを[global]セクションに書き足す。(ゲストのアクセスのために)
Add this to the [global] section. (for guest access)
------
# public shares, not just authenticated ones
usershare allow guests = yes
------
fileserverという名前で共有できるように以下を書き足す。(ゲストもフルアクセスできて、Macのごみファイルは拒否する)
Add the following so that it can be shared under the name fileserver. (guests also have full access and deny mac junk files)
[Fileserver]
comment = Fileserver on zundamon-fileserver(example)
path = /fileserver/
writable = yes
guest ok = yes
guest only = yes
create mode = 0777
directory mode = 0777
veto files = /._*/.DS_Store5.Sambaの容量の計算スプリプトを作って、それをSambaに登録する。(すべてのサーバ用HDDの容量と空き容量の計算をSamba外部でする)
5. Create a Samba capacity calculation script and register it with Samba. (Calculate the capacity and free space of all server HDDs,informed that to Samba)
まずgawkをインストールします。(awkがきちんとデフォルトの規格の整数の計算をしないためです。)そして、「/etc/samba」上にSambaに容量計算をした後の値を引き渡す計算をするスクリプト「dfree.sh」を作ってテストします。最後にそれをSambaの設定ファイルに書き足します。
First install gawk. (This is because awk does not properly calculate the default standard integer.) And create a script “dfree.sh" to pass the value after calculating the capacity to Samba on “/etc/samba" test. Finally add it to the Samba configuration file.
$ sudo apt install gawk
$ cd /etc/samba
$ sudo gedit dfree.sh
----contens of drfee.sh-----
#!/bin/bash
df |grep /fileserver |gawk '{total= total+ $2}{available = available + $4}END{printf "%d %d \n",total,available}'
-----
$ sudo chmod 777 dfree.sh
$ ./dfree.sh
61393020 52054368
(仮にファイルをHDDに入れておいたので、この結果で問題はありません)
(Because I put on the test file to the HDDs for server, so this result was outputed.It is OK.)
$ cd /etc/samba
$ sudo gedit smb.conf
(この内容をグローバルセクションに書き足す)
(Add this content to the global section)
------
# for calc. diskspace
dfree command = /etc/samba/dfree.sh
------
6.Samba再起動と内容のチェック
6. Restart Samba and check contents of Samba configration file
$ sudo service smbd restart
$ sudo service nmbd restart
$ testperm
...
...
7.ファイヤウォールの設定(規則をつけたす)
7. Firewall settings (adding rules)
$ sudo ufw allow Samba
$ sudo ufw status
...
8.設定-共有でコンピュータ名を決める。
8. Set the computer name in Settings – Sharing.
トップバーの左をクリックして、設定ウインドウを出して、左ペインの共有を押して、右ペインのコンピューター名を変えます。(これが、共有ファイル上のコンピュータ名になります。)ここでは、zundaserverとしました。
Click the left side of the top bar to bring up the setting window, press Sharing on the left pane, and change the computer name on the right pane. (This will be the computer name on the shared file.) Here, I seted it zundaserver.
9.再起動してエラーがないか確かめる。Windowsからドライブとして割り当ててプロパティで確かめる。
9. Reboot and check for no errors. Assign this server as a drive from Windows and check the properties.
再起動して、全体のエラーがないか確認してみてください。問題なければ、Windowsでファイル共有してみます。
Try rebooting and see if there are any overall errors. If there is no problem, try file sharing on Windows.
Windows上でエクスプローラを起動し、左ペインの「PC」をクリック。右ペインの何もない場所で右クリックすると「ネットワークの場所を追加する」が出てくるので、「¥¥zundaserver¥fileserver」と指定する。そうすると今作ったファイルサーバにつながりエクスプローラが開いて中が見えます。HDDの名前でフォルダがあることを確認してください。
Start Explorer on Windows and click “This PC" in the left pane. If you right-click on an empty place in the right pane, “Add network location" will appear, so specify “\\zundaserver\fileserver".Then explorer is connected to the file server you created now and open Explorer automatically,and check explorer to see the inside. Make sure you have a folder with the name of your HDD.
つぎに、前の「PC」を指定したエクスプローラのメニューの「・・・」をクリックして、「ネットワークドライブの割り当てを」選択します。同じく「¥¥zundaserver¥fileserver」と指定します。すぐにそのドライブのエクスプローラーが開きます。さきほどの時と同じように、HDDの名前のフォルダがあることを確認し閉じてください。次に、前の「PC」を指定したエクスプローラに、「zundaserverのfaileserver」ああるので、これを右クリックして「プロパティ」ウインドウを表示させます。全体の容量計算が合っていることを確認してください。
Next, click “…" in the explorer menu that specified the previous “PC" and select “Map network drive". Similarly, specify “\\zundaserver\fileserver". Explorer for that drive will open immediately. As before, confirm that there is a folder with the name of the HDD and close it. Next, in the explorer that specified the previous “PC", there is “zundaserver’s faileserver", so right-click on it to display the “Properties" window. Make sure the HDD’s size calculations of adding them collect.
10.Gnome-extentionでCPU温度を表示させておく。
10. Display CPU temperature with Gnome-extension.
Gnome-extentionでResource Moniterを入れて、サーバとして一番把握しておきたいCPU温度を表示させます。
Install Resource Monitor with Gnome-extension and display the CPU temperature that you want to know the most as a server.
簡単にUbuntu-SoftwareでExtention-managerをインストールしましょう。ランチャでそれを起動します。Resource Moniterをそのアプリでインストールしましょう。トップバーにCPUなどの表示がでます。
Install Extension-manager with Ubuntu-Software easily. Launch it with Launcher. Let’s install Resource Monitor with that app. You can see the CPU on the top bar.
CPU温度などのハードウェアの情報を取得させるには、センサー用のコマンドが必要なので、以下の様に打ち込んでインストールします。
To get hardware information such as CPU temperature, you need a command for the sensor, so type the following to install it.
$ sudo apt install lm-sensors あとは、トップバーのResource Moniterの表示部分をクリックして、設定を出します。私はアイコンは左表示にさせて、メモリとHDDはフリースペースを表示させて、ネットはデフォルトのままの表示をさせて、CPU温度についてはcoretemp:Packageと書いてある全体の温度を表示させました。
After that, click the display part of Resource Monitor on the top bar to display the settings. I set the icon to the left, the memory and HDDs to display as free space, the net to display as default, and the CPU temperature to display the overall temperature written as coretemp:Package.
11.ファイルサーバのサービス用HDDごとの利用率、利用容量、全体容量のインジケーターをデスクトップに表示させる。
11. Display indicators of usage rate, used capacity, and total capacity for each service HDD of the file server on the desktop.
「マスタークドウのページ」をWeb検索し、「Fileserverでの容量確認のconky(lua)のスクリプト conky (lua) script for checking capacity on Fileserver」から、「diskspace-conky.zip」をダウンロードします。そのファイルを展開して、自分のホームにコピーします。これを動かすために、以下のコマンドで「conky」の全体をインストールします。
Search the web for “Master Kudou’s page" and download “diskspace-conky.zip" from “conky (lua) script for checking capacity on Fileserver“. Extract that file and copy it to your home path. To make it work, install the entire “conky" with the following command.
$ sudo apt install conky-all そのまま「conky」とコマンドを打てば、hddname-1からhddname-3までは表示されるようになっています。あなたのすべきことは自分のHDDでそれを動くように直すことです。その直すファイルの1つは、ホームパスにある「.conkyrc」、もう1つは「.lua/scripts/clock_rings.lua」です。このファイルたちのうち直すべき箇所は、HDDのパス(/fileserver/hddname-1等)と、HDDの表示上の名前(hddname-1等)、位置指定部分(x=,Y=やvoffset,go to です。また、HDDの項目を増やすためには、そのファイルの中でも説明している通り、1つのHDDの記述単位を、HDD設定の部分ににつけ足していきます。
If you type the command “conky" as it is, hddname-1 to hddname-3 will be displayed. What you should do is fix it to work on your HDDs. One of the files to fix is ".conkyrc" in your home path and the other is “.lua/scripts/clock_rings.lua". Among these files, the parts that need to be fixed are the HDDs path (/fileserver/hddname-1 etc.), the HDDs display name (hddname-1 etc.), the position specification parts (x=, Y=, voffset, go to) . if you want, Increase the number of HDDs items( as explained in the file own) add one HDDs description unit to the HDDs setting part.
さいごに、このインジケーターを、「自動起動するアプリケーション」に入れて、自動起動することです。ランチャで、「自動起動するアプリケーション」を起動して、以下のコマンドを追加してください(名前はあなたがわかるようにつければ任意でいいです。)
Finally, put this indicator in “Applications to auto-start" and auto-start it. In the launcher, start “Applications that start automatically" and add the following command (The name in the settings can be anything you want so that you can understand it.)
bash -c 'sleep 20;conky ここで20秒待つのは、HDDなどの初期操作が終わることを考えてですので、自分の環境でちょうどよい値を入れてみてください。
Waiting for 20 seconds here is for the sake of finishing the initial operations of the HDD, so please enter a value that is appropriate for your environment.
以上で説明は終わりです。
わかりやすいチュートリアルビデオをYouTubeに用意しましたので、実際の操作がわからない方は見てください。
This is the end of the explanation.
We have prepared an easy-to-understand tutorial video on YouTube, so please watch it if you don’t know the actual operation.
なお、英語字幕もついています。
It also has English subtitles.